Let’s Make Pleated Jeans!
Hello!
I recently made a pair of self drafted, white, pleated jeans for myself, and I thought I would share my drafting process with you, in case you’re interested in making something similar!
Quick story time on where this idea came from before we start: I got this beautiful pair of brown denim pleated jeans about a year and a half ago, and they felt like a huge statement piece to me at the time. I wasn’t very used to wearing voluminous / pleated trousers at that point, but I quickly fell in love with them. So much so that my partner got me the white colourway as a lockdown-anniversary present! Sadly, the sizing seems to be quite different in the two pairs, and combined with all the muscle I lost during this hellish year, they are far too big for me at this point. I will try to take them apart and reconstruct them one day, but until then, I have something even better for you: I made myself a pair from scratch, using my trouser block, and I will walk you through my steps so that you too can make a pair if you’re interested!

Before we begin, a quick disclaimer: I don’t have any formal education in patternmaking, and it’s very possible that I’m doing certain things “the wrong way”, hence why I don’t call this a tutorial. This is merely a walkthrough of the steps I took to achieve my jeans. If you’re interested in making your own, I would recommend that you take this all with a healthy dose of skepticism, and experiment to see what you prefer :)
Intended Fit
So first, let’s analyze the intended fit of these and take a look at the details I want to incorporate to the pattern:
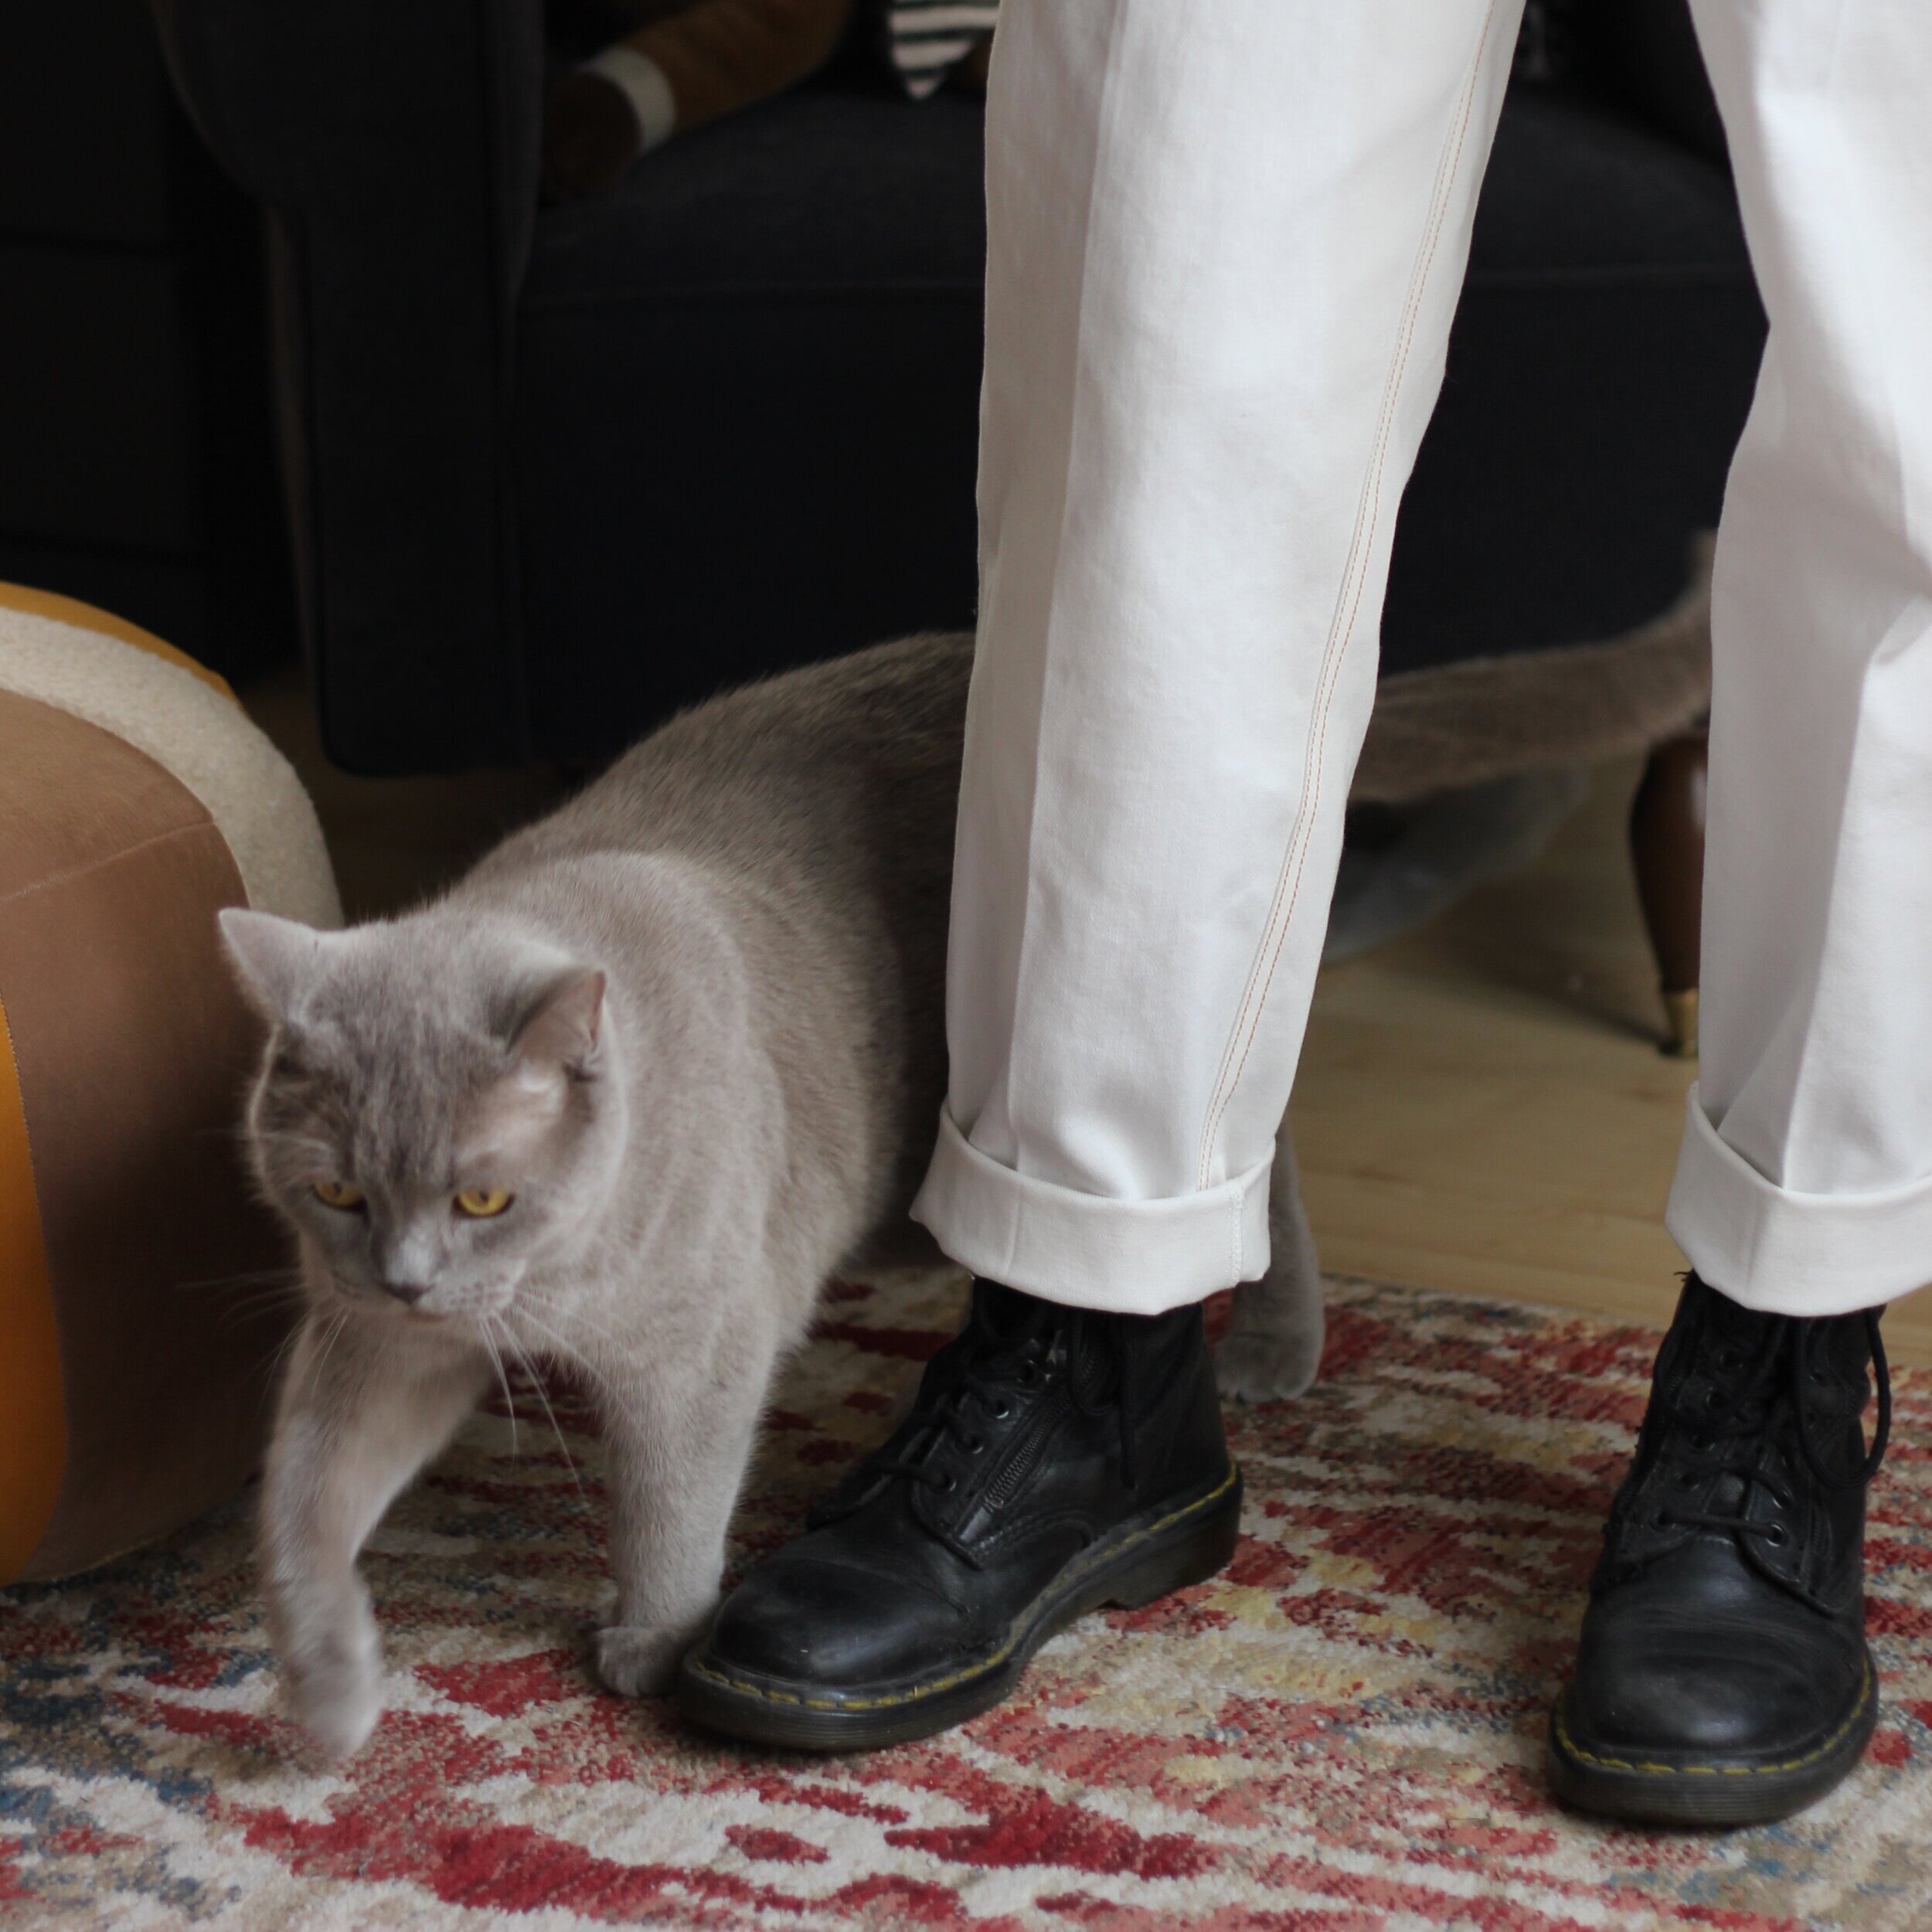
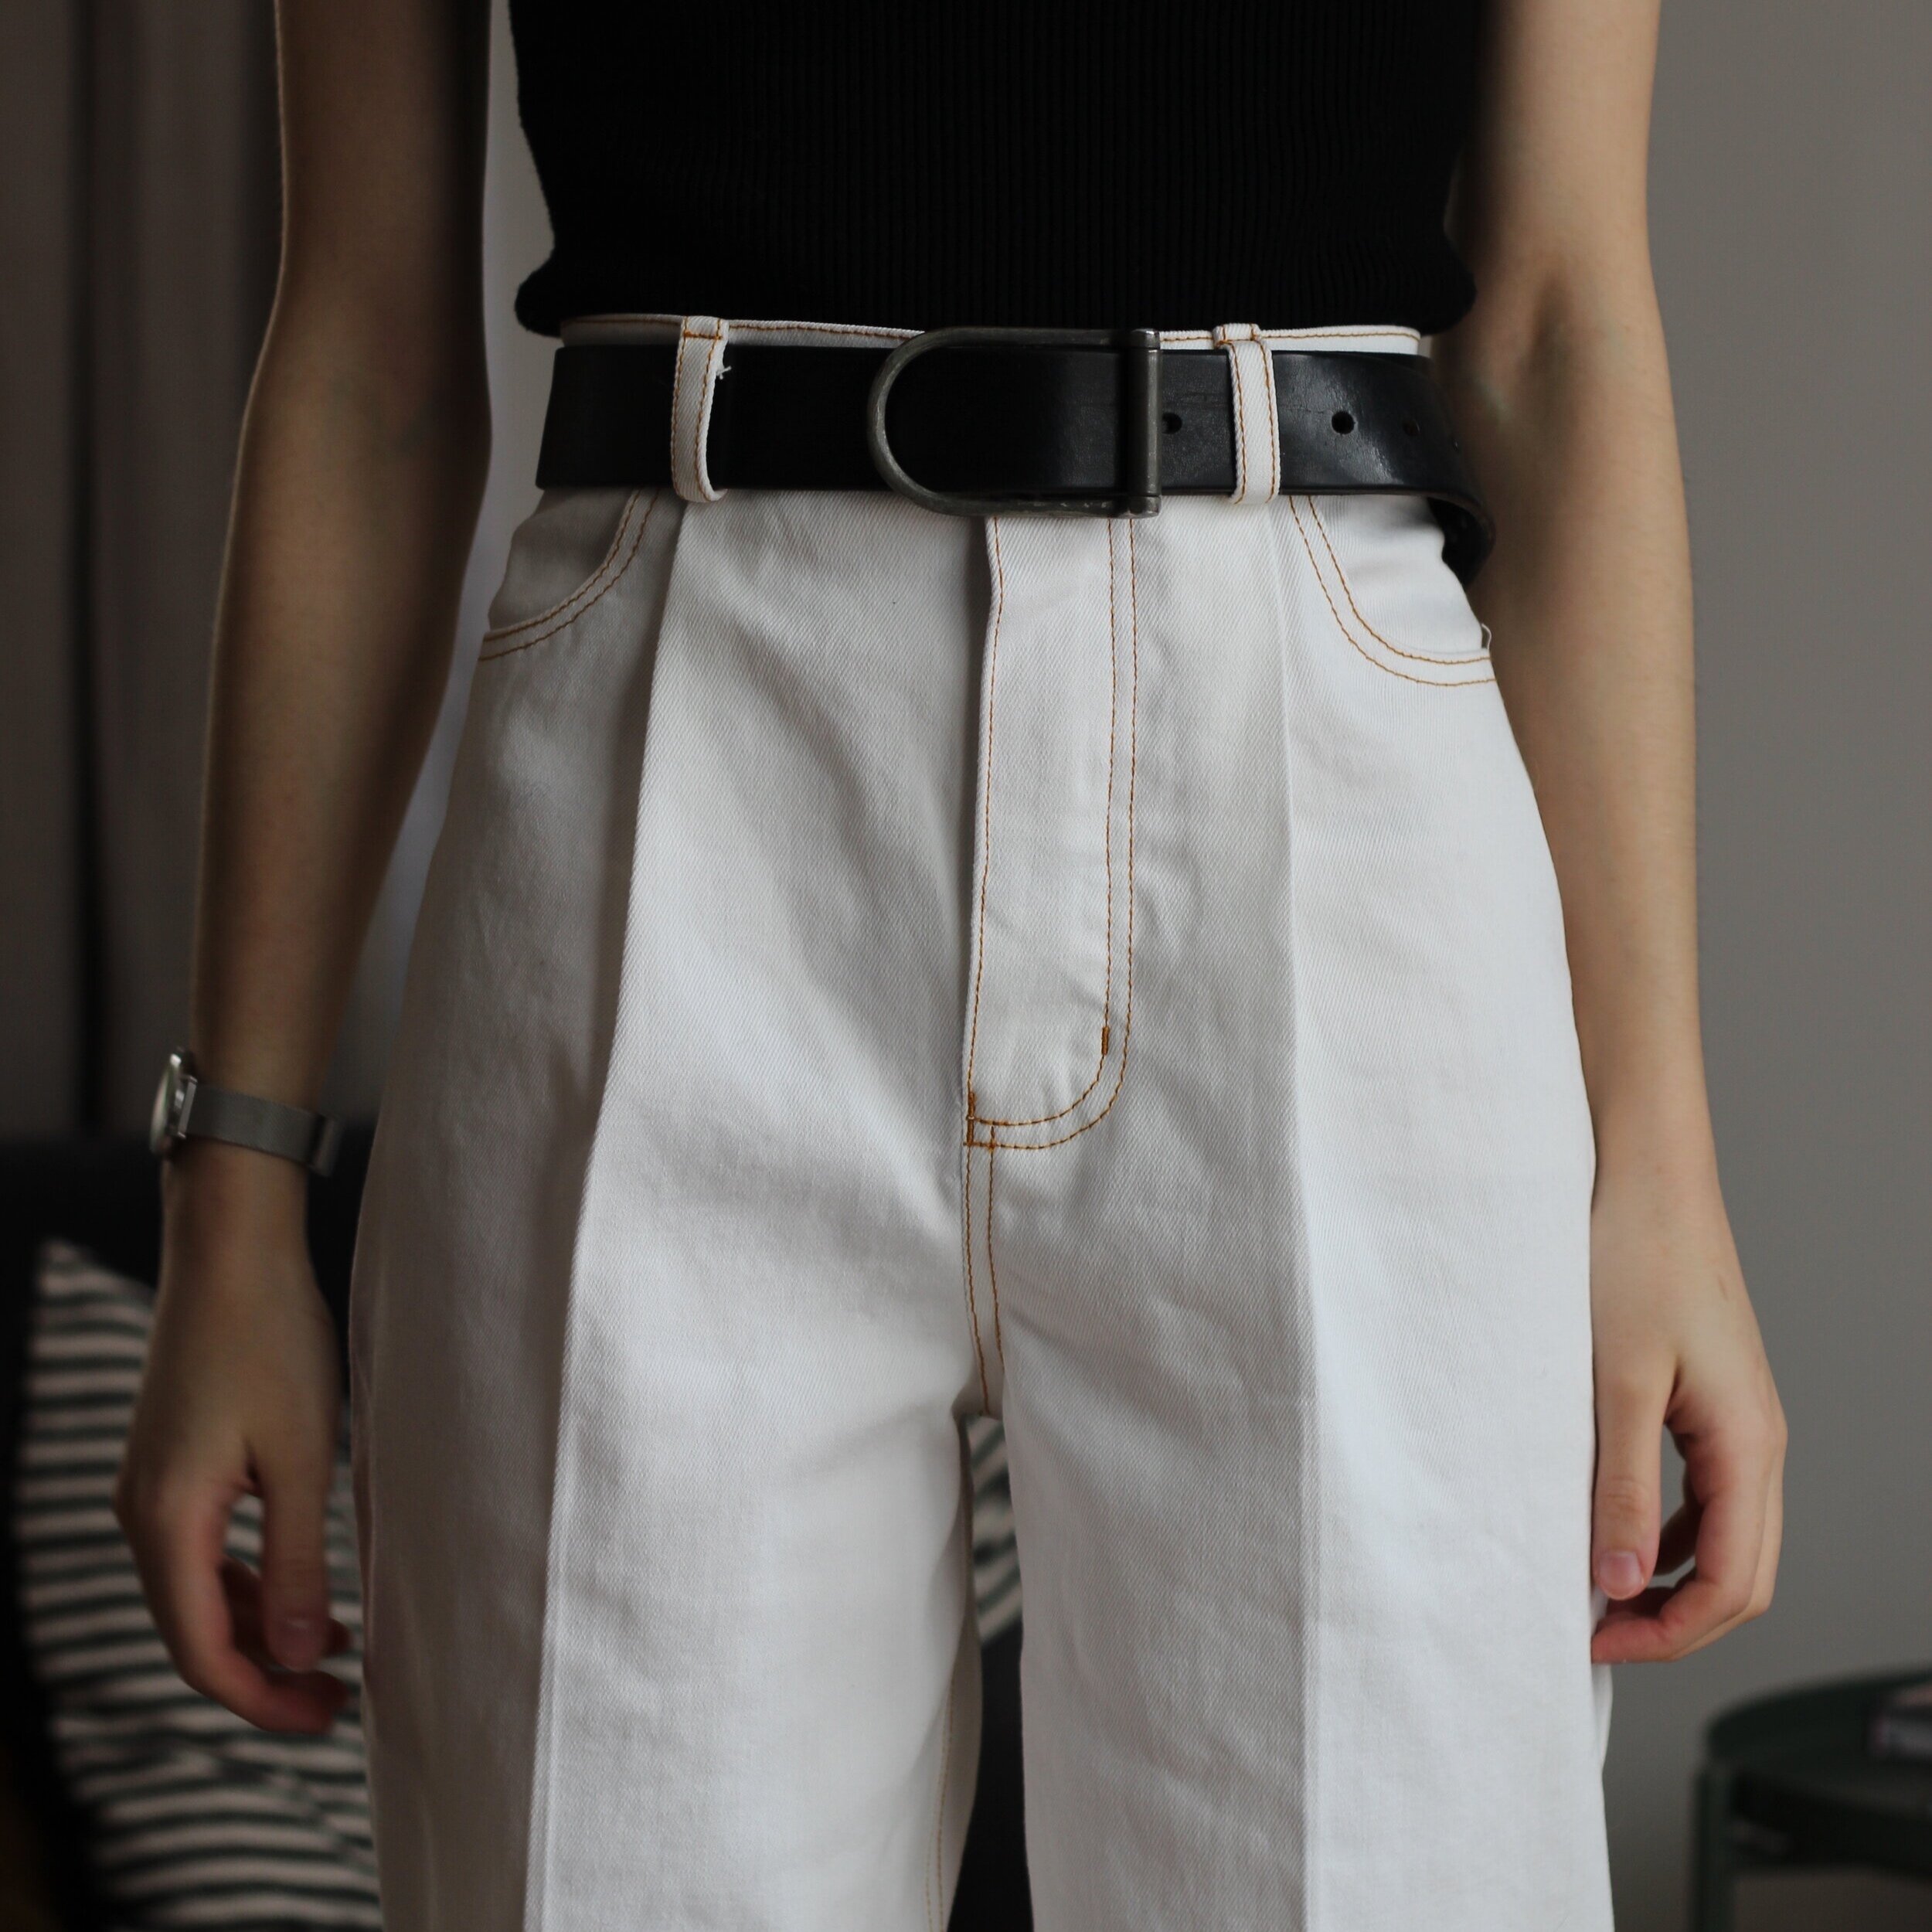
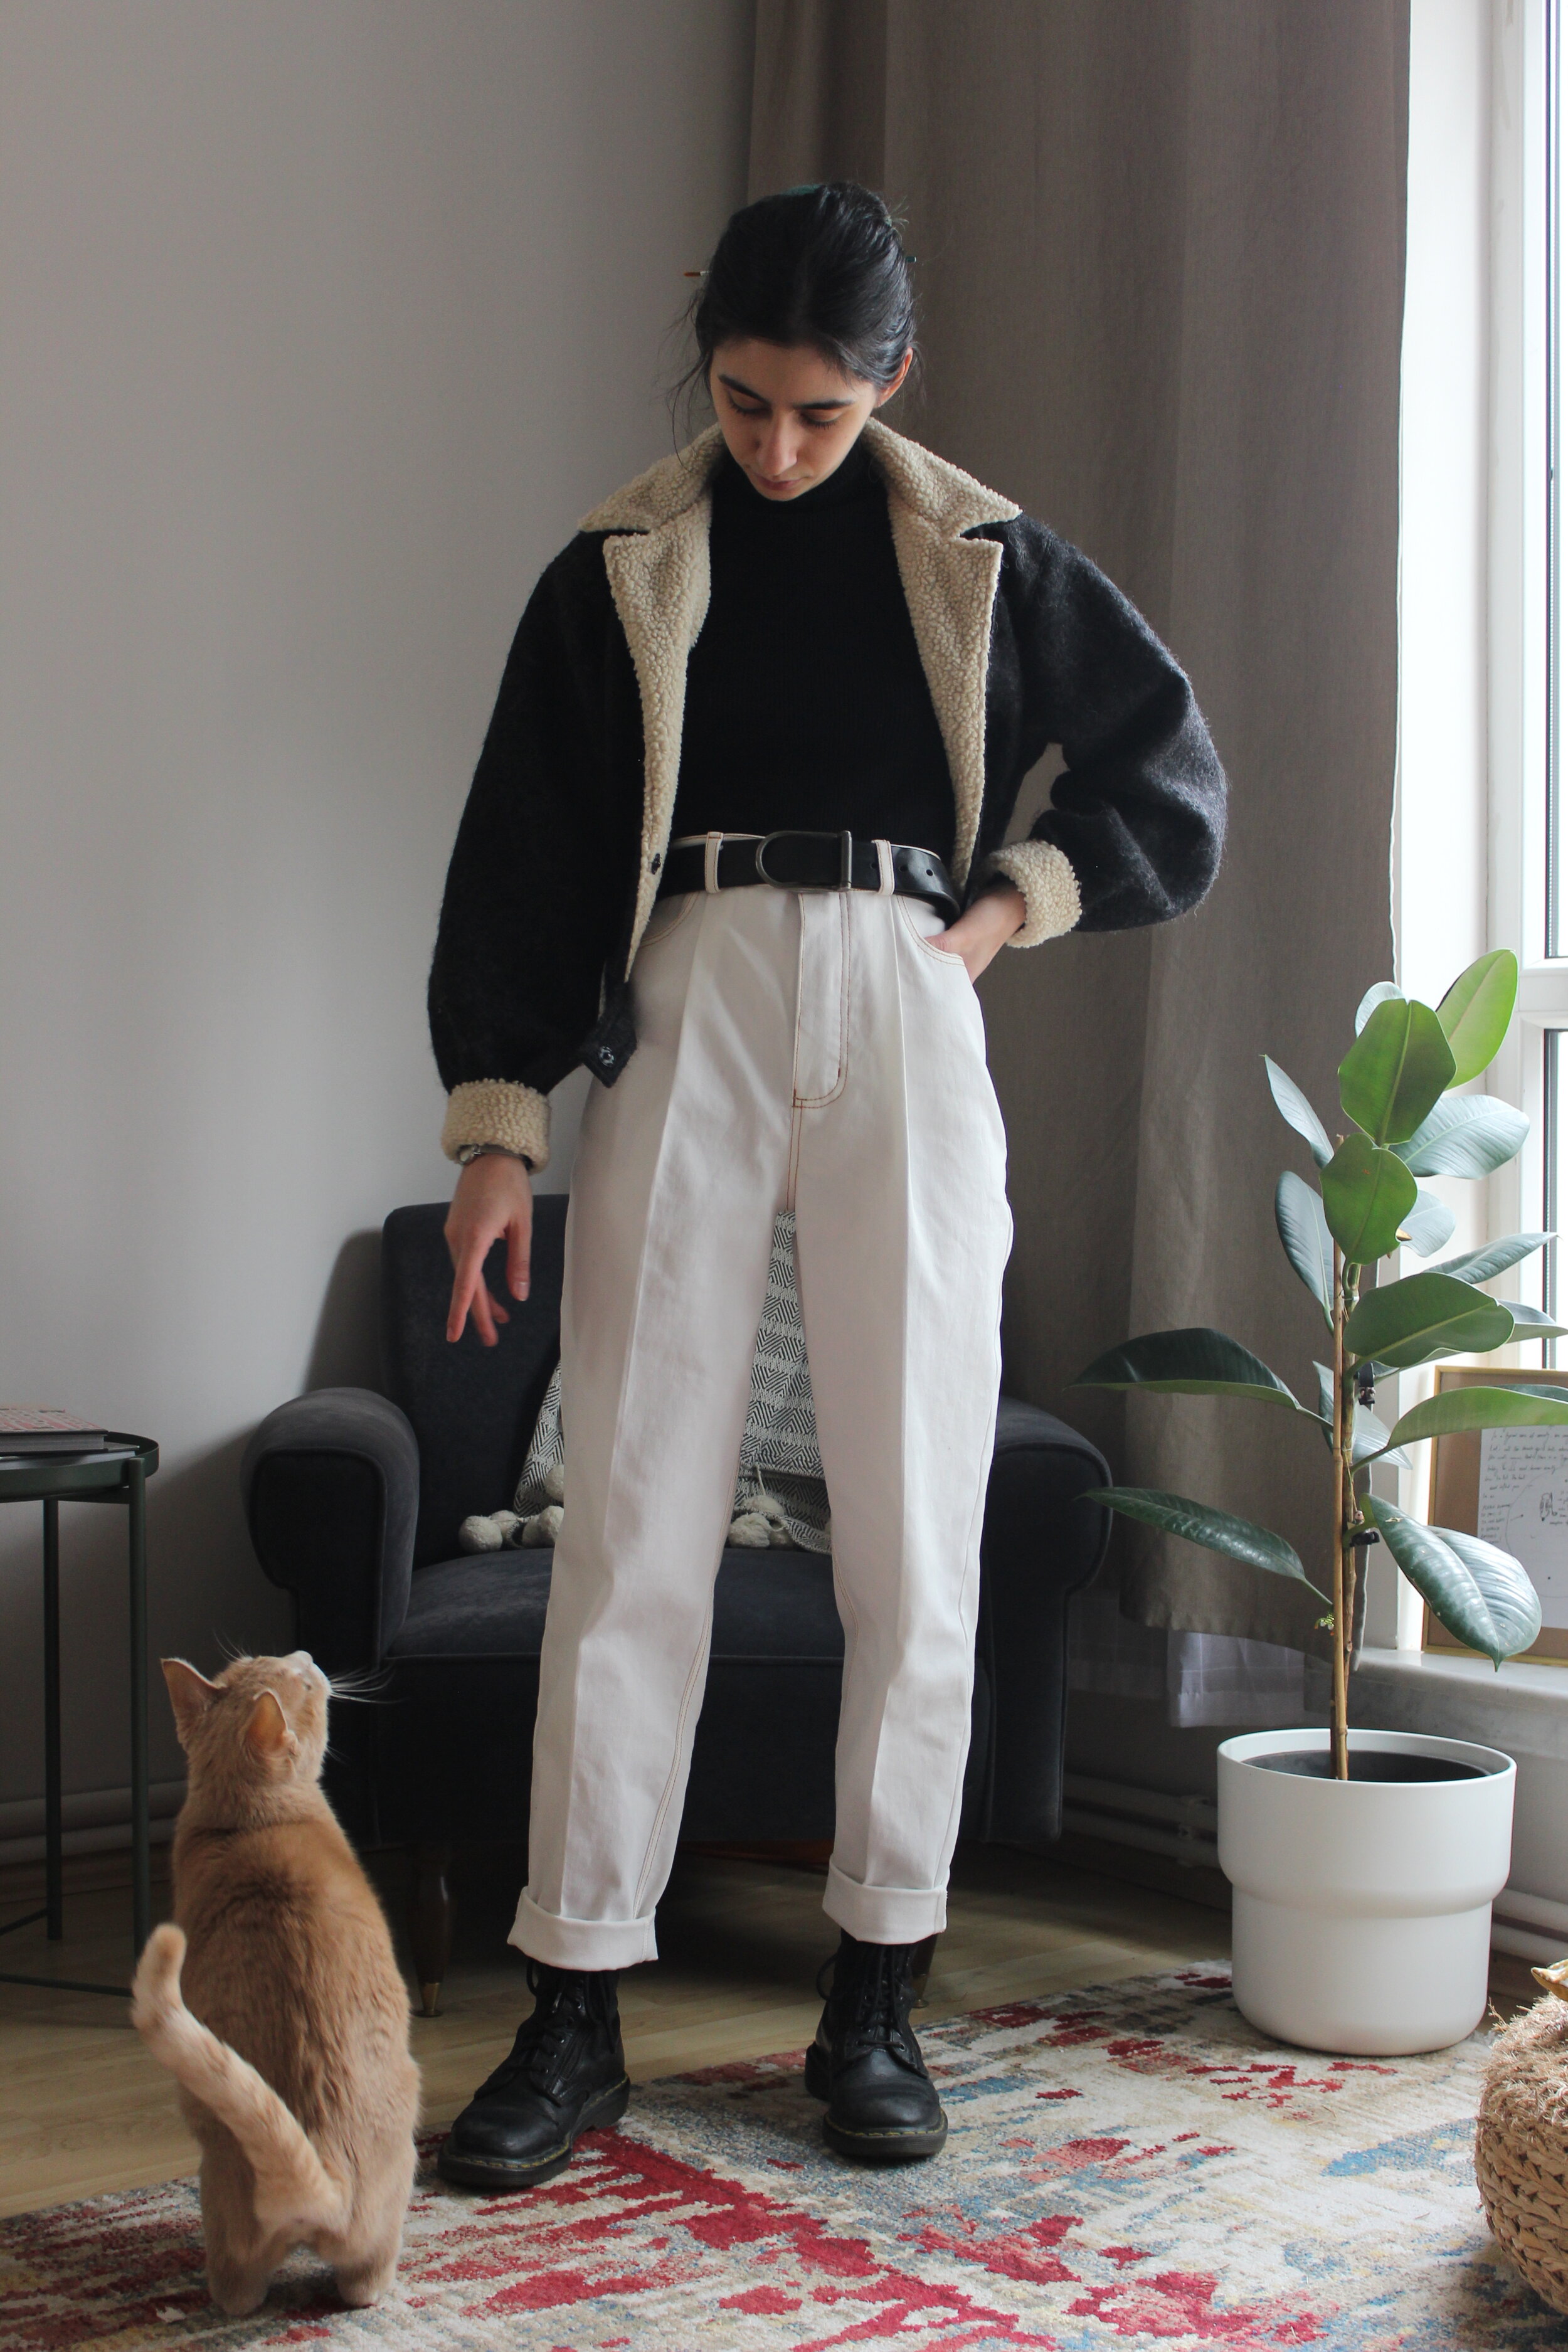
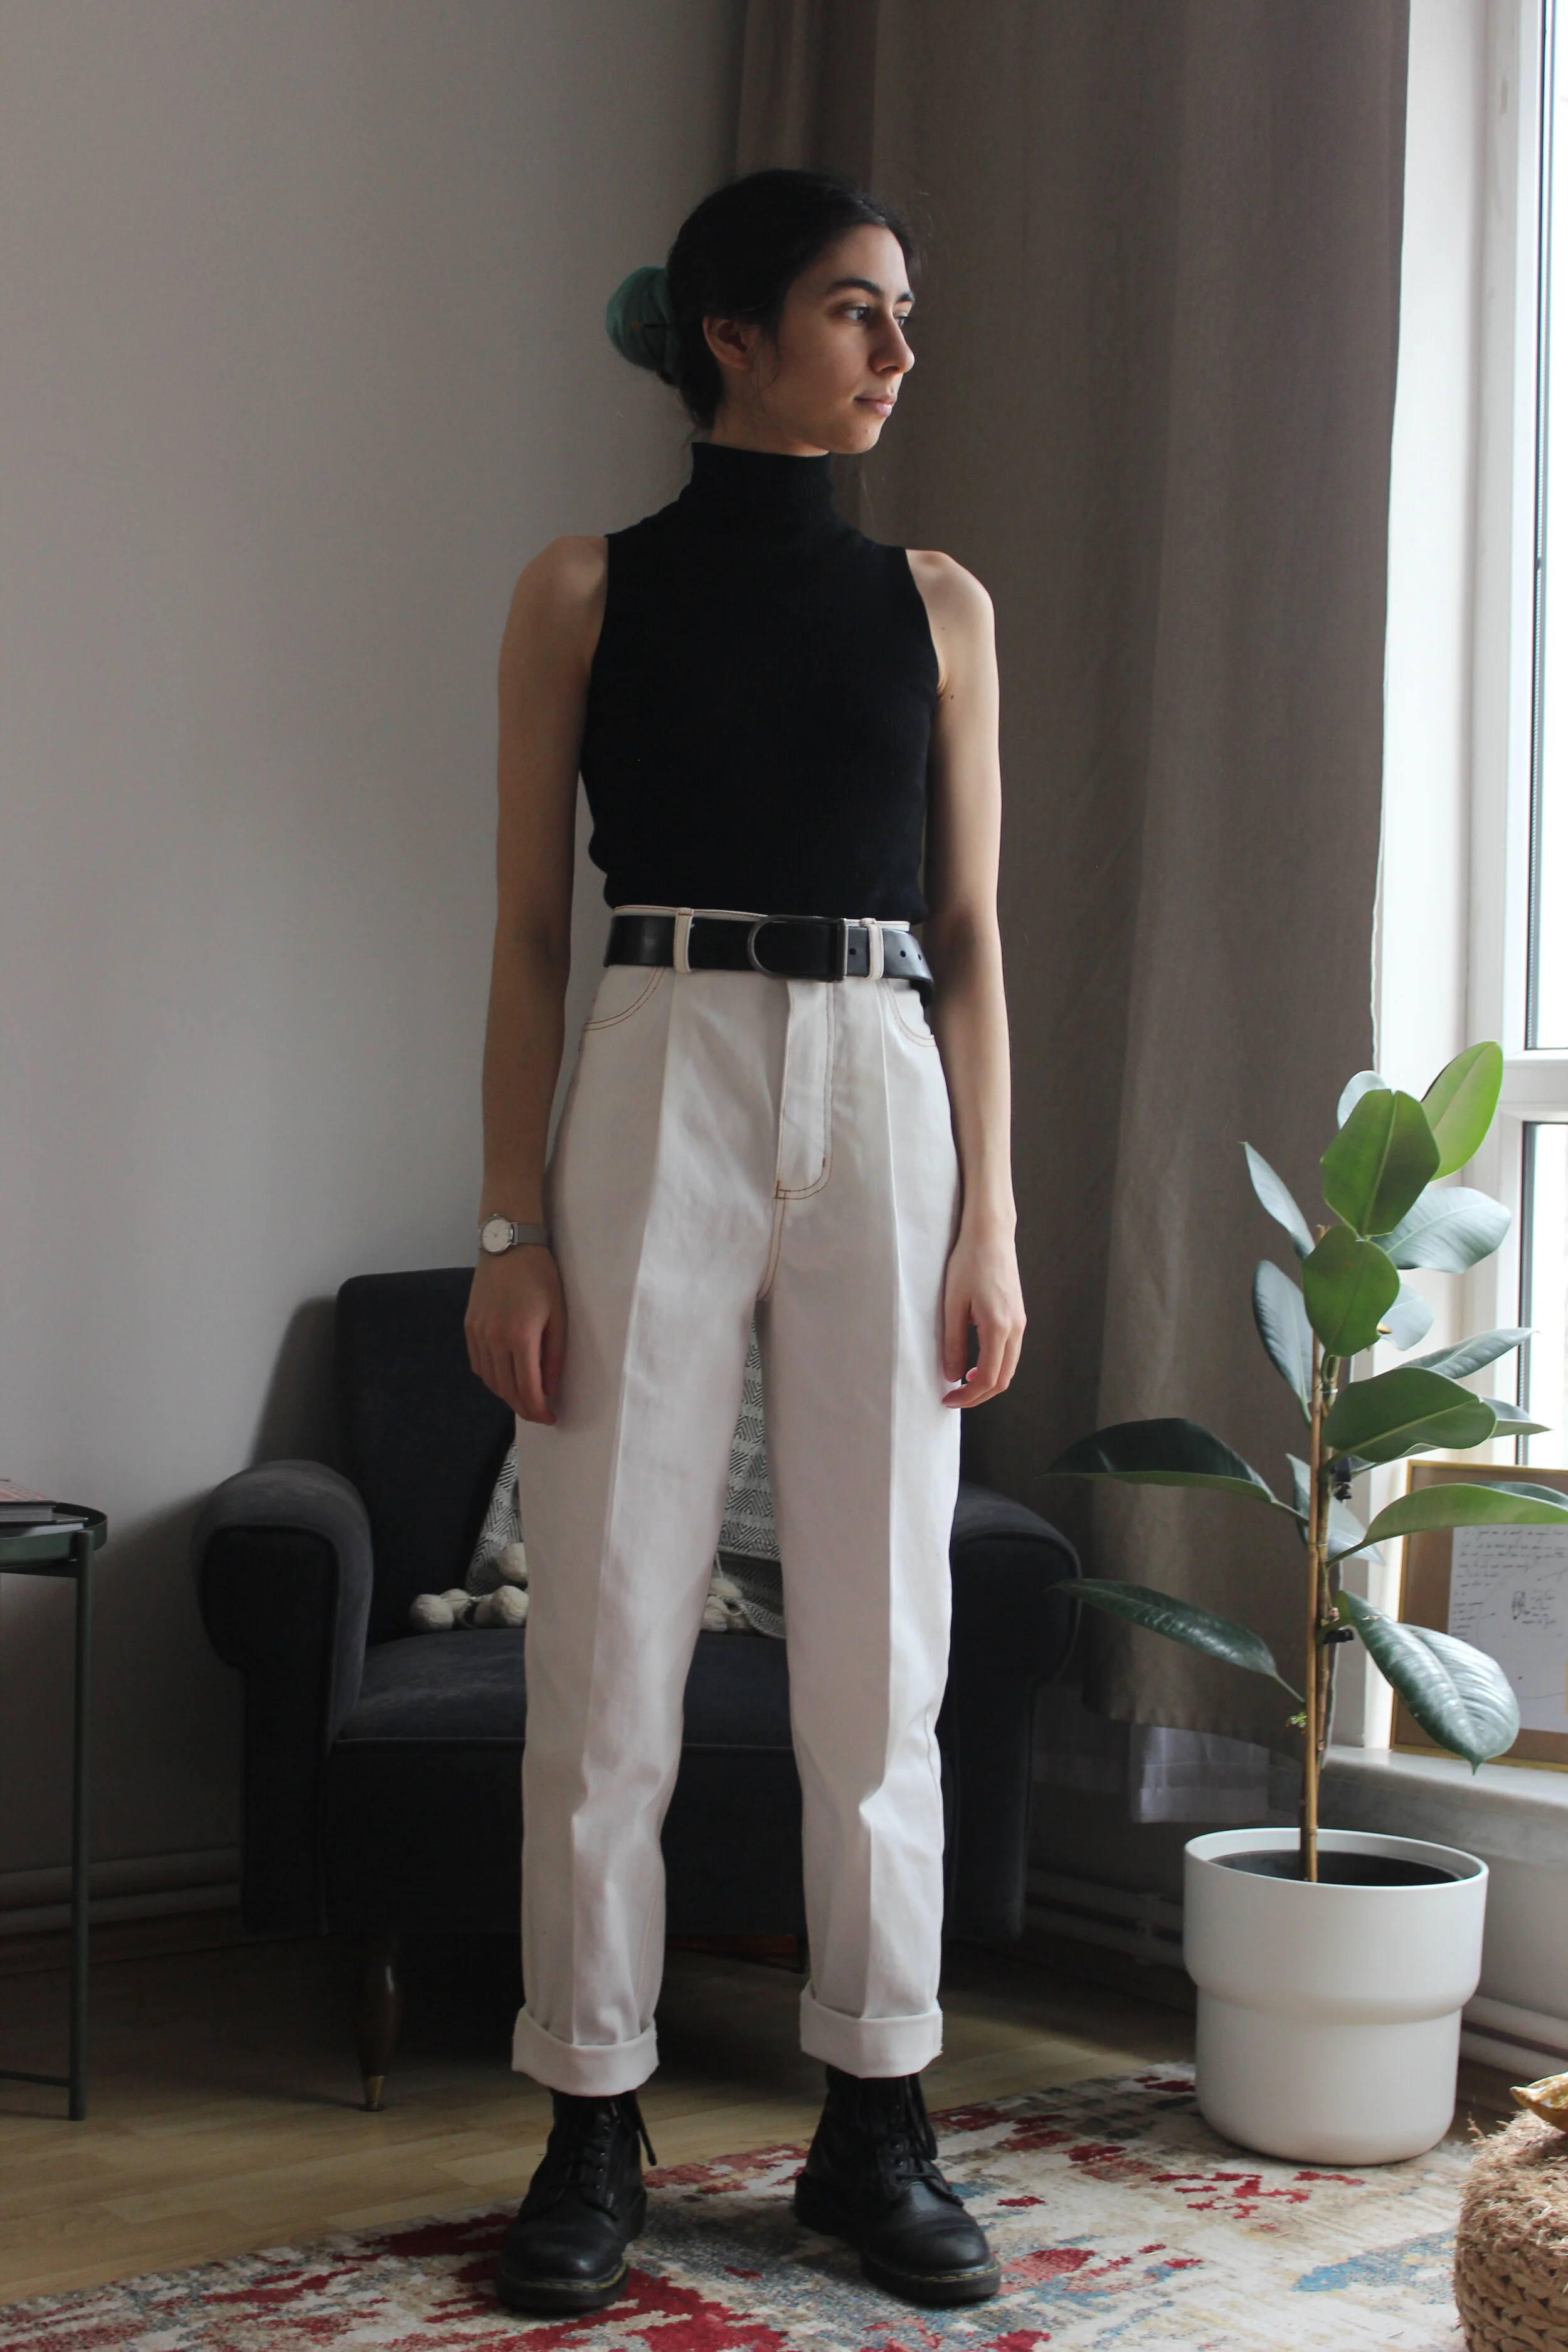
One big (3cm deep) pleat on each side of the front.
A close fit around the waist and the hips, shifting to a more relaxed fit throughout the crotch and the legs.
A super high rise, with the waistband sitting at the natural waist.
Classic jeans details, such as the front and back pockets, the back yoke, double topstitching throughout the garment.
Slightly tapered legs.
Trousers vs. Jeans
I started from my trouser block, since I know it fits me perfectly, and more importantly, I want the crotch area of these pleated jeans to fit me like trousers. Here’s a slight tangent on what I mean by that:
The length of the crotch extension on your pants pattern greatly influences the overall style of the pants. For instance, for cullottes, you would go for a much longer extension so that the garment doesn’t touch your body apart from the waistline, while for jeans, you would have a much shorter extension so that the garment contours and hugs your body along your abdomen and hips. I would highly recommend checking out the Pants chapter of Helen Joseph Armstrong’s Patternmaking for Fashion Design (I have the 5th edition, and the relevant section is on page 567) for more detailed information on this topic.
Trousers fall somewhere in between culottes and jeans. They have a longer crotch extension than jeans, making them fit much more loosely around the crotch and legs, which is exactly what I’m going for. However, if you want your pleated jeans to fit like, well, jeans, then I would recommend you start with a jeans pattern that fits you well and go from there.
The Pattern Drafting
Okay, let’s dive in!
Adding the pleats: I cut the front piece of my trouser block from the waistline down to the hem, following the grainline / creaseline. I left a little hinge on the hem, so that I could easily spread the pattern. On a fresh piece of paper, I drew a long straight line. I placed my slashed front block so that the line I drew would centre the slash I have just made. I decided to go for a 3 cm deep pleat, which meant that I would spread the the block by 6 cm at the waistline. I traced around this new shape, and then folded the pattern paper in the same way that you would fold the pleat on your actual fabric. I traced over the waistline using my tracing wheel in order to true up the pleat I added.
Adding the back yoke: Since I was started out using a trouser block, I only had a dart on on my back pattern pieces. I marked 7.5 cm / 3” down from the waistline on the center back, and 3.75 cm / 1.5” down from the waistline on the side seam. I connected these two points with a straight line, and traced the upper half using some scrap paper. I closed the remainder of the dart, causing the the yoke to curve up. I walked the seams that would connect the back of the jeans to the back yoke and trued them up.
I freehanded some jeans style front pockets and back patch pockets, as well as add in the fly facing pieces to the front pattern piece.
Now for my new favourite part, drafting the pocket stays. I once again closed the pleat on the front pattern piece, and traced around the upper section including the fly facing. I decided on the depth I wanted for my pocket, and marked it on the side seam. From there, I drew a curved line going towards the middle of the fly facing. You will need two of these pattern pieces: One with the front pocket shape cut out, and one with it intact. I also quickly drafted a facing piece for the front pocket opening.
Finally, I used a straight waistband since these sit right on my natural waist. I used a rectangle that measured 10 cm / 4” x the waistline of the jeans for the waistband, and also a 4 cm (1.5”) x 60 cm / 23 ⁵/₈” rectangle to make six 1 cm x 10 cm (³/₈” x 4”) belt loops.
Add your preferred seam allowance to everything and that’s it! The pattern is now ready to be put together.
Construction Details
I didn’t end up documenting the sewing process for these jeans, since I was figuring it out as I went. There isn’t anything radically different about the construction of these jeans compared to any other jeans pattern, so I thought I would just highlight some of the choices I made about fabric and construction.
The fabric I used is an off white 10.4 oz denim with a very small amount of stretch to it. I didn’t intent to get something with lycra in it, but since it was such a small amount I decided it wouldn’t affect the look and feel of the jeans too much. I didn’t run into any issues with the stretch, but the fabric was dramatically off-grain when it came in the post. We spent hours trying to block it and pull it back into shape, but it didn’t recover fully. Let’s hope it doesn’t twist itself into a weird shape in the future :’) If you’re curious abouthow or why you should block your fabric, I will direct you towards Michele’s blog post about it!
I used pocket stays for the first time, and I’m NEVER going back to normal ones! They make sure that the pocket bags stay in place as you put the jeans on / off, they keep the front of the jeans super flat which means that the pleat looks super nice and crisp, and they also add an additional layer around your tummy, making everything feel more secure. I finished the bottom edge of my pocket bag using French seams, and as for the fly, I used my usual method. Closet Core Patterns has a great tutorial on the method I favour, and their sample has pocket stays so you can see how it all works out! Click here for the link.
I forgot to add extra seam allowance needed for flat felled seams, so I just went for faux flat felled ones. I overlocked the raw edges together, pressed them to whatever side the construction called for, and then did two lines of topstitching. One line was 1.5 mm away from the seam, and the second one was 6 mm away from the first topstitching line. For the first line I moved my needle 1.5 mm to the side and followed the original seam with the centre of my presser foot, and for the second one I used my quarter inch presser foot. The topstitching thread I used is number 412 from Gütermann.

Final Thoughts
I really, really like how these came out! They are super comfortable, I’m mostly pleased with how they fit, and you know I’m a sucker for pleated pants of all sorts. I love that the denim has enough structure to maintain the overall sort of architectural shape of the jeans, and I feel like these will age beautifully as the denim wears out and softens with use.
One small issue I have is that the back rise is a bit too tall, causing some collapsing at the waist. They also be a bit tighter around the waist. I’m not too bothered by either of these issues, but they are just something to improve upon next time I make a pair :)
I think that’s about it? Do let me know if you have any questions about it, and tag me / dm me a picture if yo end up making a pair! I would love to see it.