Gilbert Top by Helen’s Closet

Helloo! I just completed my second Gilbert Top yesterday, so I wanted to write a blog post going into detail on all the adjustments and modifications I made to the pattern, as well as offer a small review of the pattern itself. If you have questions about any of the modifications I mention below, make sure to check out the “Gilbert / SBA” highlight on my Instagram account, and if something is still unclear, feel free to leave a comment below or dm me on İnstagram :) Enjoy!
The Modification & Adjustment Saga
I love camp collar shirts so, *so* much, and when I saw that Helen’s Closet came out with the Gilbert Top I knew I had to get it! I made my first one back in July when I was pretty clueless about (sewing) cup sizes and bust adjustments. I picked the size 0 based on my full bust measurement, and it ended up being a bit too constricting around my high bust - armpit area.

This is that first Gilbert top. You can see the wrinkles that formed around my armpits on the sleeves, as well as the extra fabric that pooled around my chest. Another hint that something was wrong was the fact that the front hung lower than the back, since I didn’t have the boobs to support it and lift it up. Also: what exactly is that dart doing there?
I didn’t get why this was the case at the time, but I started thinking about it more and more as the time went by. After seeing a few friends talking about small bust adjustments in their stories and posts on Instagram, I decided to look into it and had a revelation: You see, my high bust measurement is almost a full inch (2 cm to be exact) bigger than my full bust measurement. Since I had a negative 1 inch difference between my full and high bust measurements, that meant that I was at a triple A cup size; while the pattern was drafted for some with a B cup, so a 2 inch positive difference between their full and high bust measurements.
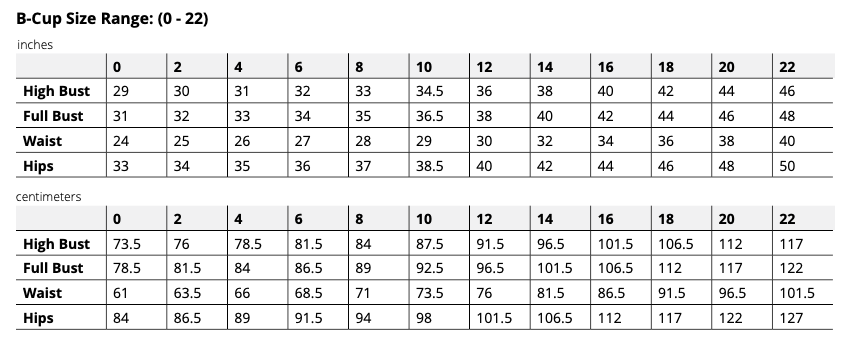
The size chart for the B-Cup size range of 0 to 22 for the Gilbert Top. My measurements are 30 inches / 76 cm for my full bust and 31 inches / 78 cm for my high bust. My waist is 23 inches / 58 cm, and my hips are 34 inches / 86 cm.
So, I decided to try again. This time I chose a size based on my high bust measurement (size 4) and performed an SBA on the pattern following this wonderful tutorial by Aneka from Made to Sew. I was supposed to take out 7.5 cm / 3 inches but that ended up distorting the pattern too much, so I went with 4 cm / 1.5 inches instead. This ended up removing the bust dart, which I wanted to do regardless of the SBA because it made no sense on my body. It pointed down to my stomach rather than my bust apex, and my chest just doesn’t need a bust dart, especially on a relaxed fit like this.

This is what the front looked like before I did the SBA.
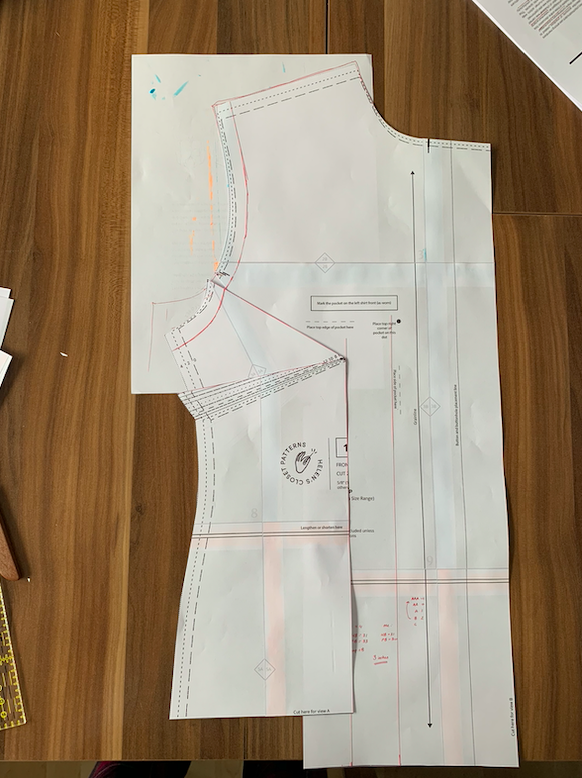
And this is after the SBA. you can see the original shape of the armscye traced in red on the A4 sheet behind the pattern.
I also straightened out the side seams on the front and the back to get rid of the curve they had and make the shape as boxy as possible.
My next adjustment was to play with the armscyes and the sleeves: I wanted the armscye to sit lower than the original pattern, and this was partly facilitated by the SBA I had just done. I ended up dropping it by 4 cm / 1.5 inches on the front and the back, as well as adjusting the sleeves to fit into their new homes. For these steps, I used the relevant instructions from the raglan sleeves section of Helen Joseph Armstrong’s Patternmaking for Fashion Design (5th edition). You can find them on pages 348 and 349.
I had one last gripe with the original fit, and that was how tubular and narrow the sleeves were for an intentionally relaxed shirt like Gilbert. From what I can see, the larger sizes don’t have this look to the sleeves, so maybe it has something to do with grading? Or maybe that’s the intended look. Either way, I wanted them to be more voluminous and relaxed to go with the boxy shape of the shirt. To do so, I simply slashed from the hem up to the central shoulder notch, and spread it by 5 cm / 2 inches at the hem. I straightened the hem out, and voila! Relaxed sleeves for my relaxed shirt.
You can see more pictures of the modified pattern pieces on the Gilbert / SBA highlight on my Instagram profile.

A Small Pattern Review
While we’re here, I thought I would include a short review of the pattern in case you’re interested in purchasing it!
As you might imagine from all the trouble I went into to make it work for me, I really like this pattern. The camp collar has a beautiful shape, and I love that you can adjust how the collar and lapels look by moving the buttons up or down. I also really appreciate that it has a yoke on the back, which makes adjusting the back much easier and offers a really clean and beautiful finish on the inside. The only places on which I used my overlocker were the sleeves and the side seams, and even those can be easily finished with flat felled seams or french seams if you don’t want to use or don’t have an overlocker.
I do, however, think there is room for improvement when it comes to the bodice for their smallest sizes. First of all, from what I can see more than a couple of people who fall on the smaller side of the size chart are having issues with the location and direction of the dart, but this can be easily remedied by moving the dart. Secondly, the sleeve shape looks a bit different in their smaller sizes compared to their mid-sizes and up. As I mentioned above, I find it to be really tubular and rather narrow for a shirt with an intentionally relaxed fit. This too is an easy fix, (I tackled it by slashing and spreading as detailed above) but it’s something to keep in mind. Other than these two, all the other issues I had were specific to my body and I don’t think they have anything to do with the pattern itself. My only tip would be that if you are smaller than a B cup (aka, if your full bust is less than 2 inches bigger than your high bust) definitely do a mockup and maybe look into doing a small bust adjustment on it.
The instructions and illustrations are absolutely crystal clear, they make learning new techniques like using the burrito method or constructing a camp collar very accessible to beginner sewists. It comes together surprisingly quickly (I made my last one in just 2 hours!) and it’s a very satisfying project. It also comes with two hem and two sleeve options, so there is some room to play if you like how it fits on you :)
Overall, I really like this pattern, and now that I modified it into a more relaxed shape that fits me correctly, I’m excited to make lots and lots of them :)

Details on the Final Version
I decided to use a beautiful, natural beige Şile cloth (a type of cotton gauze that takes its name from the Şile district in İstanbul) from my stash to make this version. I loved this fabric since I was a kid, but I was really scared to sew with it for some reason. I was mostly worried about if it would lose its crinkled texture while I was pressing it, but as it turns out, it’s a surprisingly easy fabric to work with! It pressed like a dream and retained all its texture, and it didn’t even unravel or fray that much! I used under a meter of fabric to make it and ended up with some pretty sizable scraps, making this the perfect pattern for larger scraps and remnants I acquire.
I love, love, LOVE how this new and improved version looks and feels! I feel like a cool dad when I’m wearing it, especially paired with my self drafted double pleated Mylo trousers. It’s super comfortable to wear, and I see many many Gilberts in my future now that I have this modified pattern :)