Deer & Doe Spring Collection Review: Fougère Overshirt, Genêt Pants and Hysope Top
Hii! Long time no see but today I’m back to share 3 pattern reviews in one blog post to hopefully make up for my absence :’) The lovely team at Deer and Doe Patterns reached out to ask me if I would like to review their newest patterns and I immediately jumped on the opportunity because this collection honestly looks like it was designed for me! It includes the Fougère Overshirt, the Genêt pants and the Hysope top, all of which l will go over in this blog post.
Details About the Collection
This collection is the first new collection of patterns from Deer and Doe that comes in their new extended size range! All three patterns are available in two size groups: EU 34-48 and 46-60, covering the following range of measurements:

Deer and Doe Patterns are drafted for a height of 168 cm / 5’6”, and a C/D cup size. Here’s a link to their sizing page for more information. My current bust-waist-hip measurements are 76 cm / 30”, 58 cm / 23”, 84 cm / 33” and I’m 163 cm / 5"‘4”. Deer and Doe’s size 34 bottoms are a near-perfect fit for me, and their size 34 tops aren’t that far off either. I made a size 34 for all three patterns, and I only had to adjust the Hysope top for size and fit.
Fougère Overshirt
The Fougère shirt pattern includes an oversized overshirt view, and a cropped, bomber-silhouette jacket view. It features interesting three-piece sleeves with vents instead of plackets, a classic collar with a separate collar stand, patch pockets on the chest and depending on the view you choose a box pleat at the back, or an elasticated waistband. It has a lovely, oversized fit that makes it really easy to throw on top of your existing outfit.
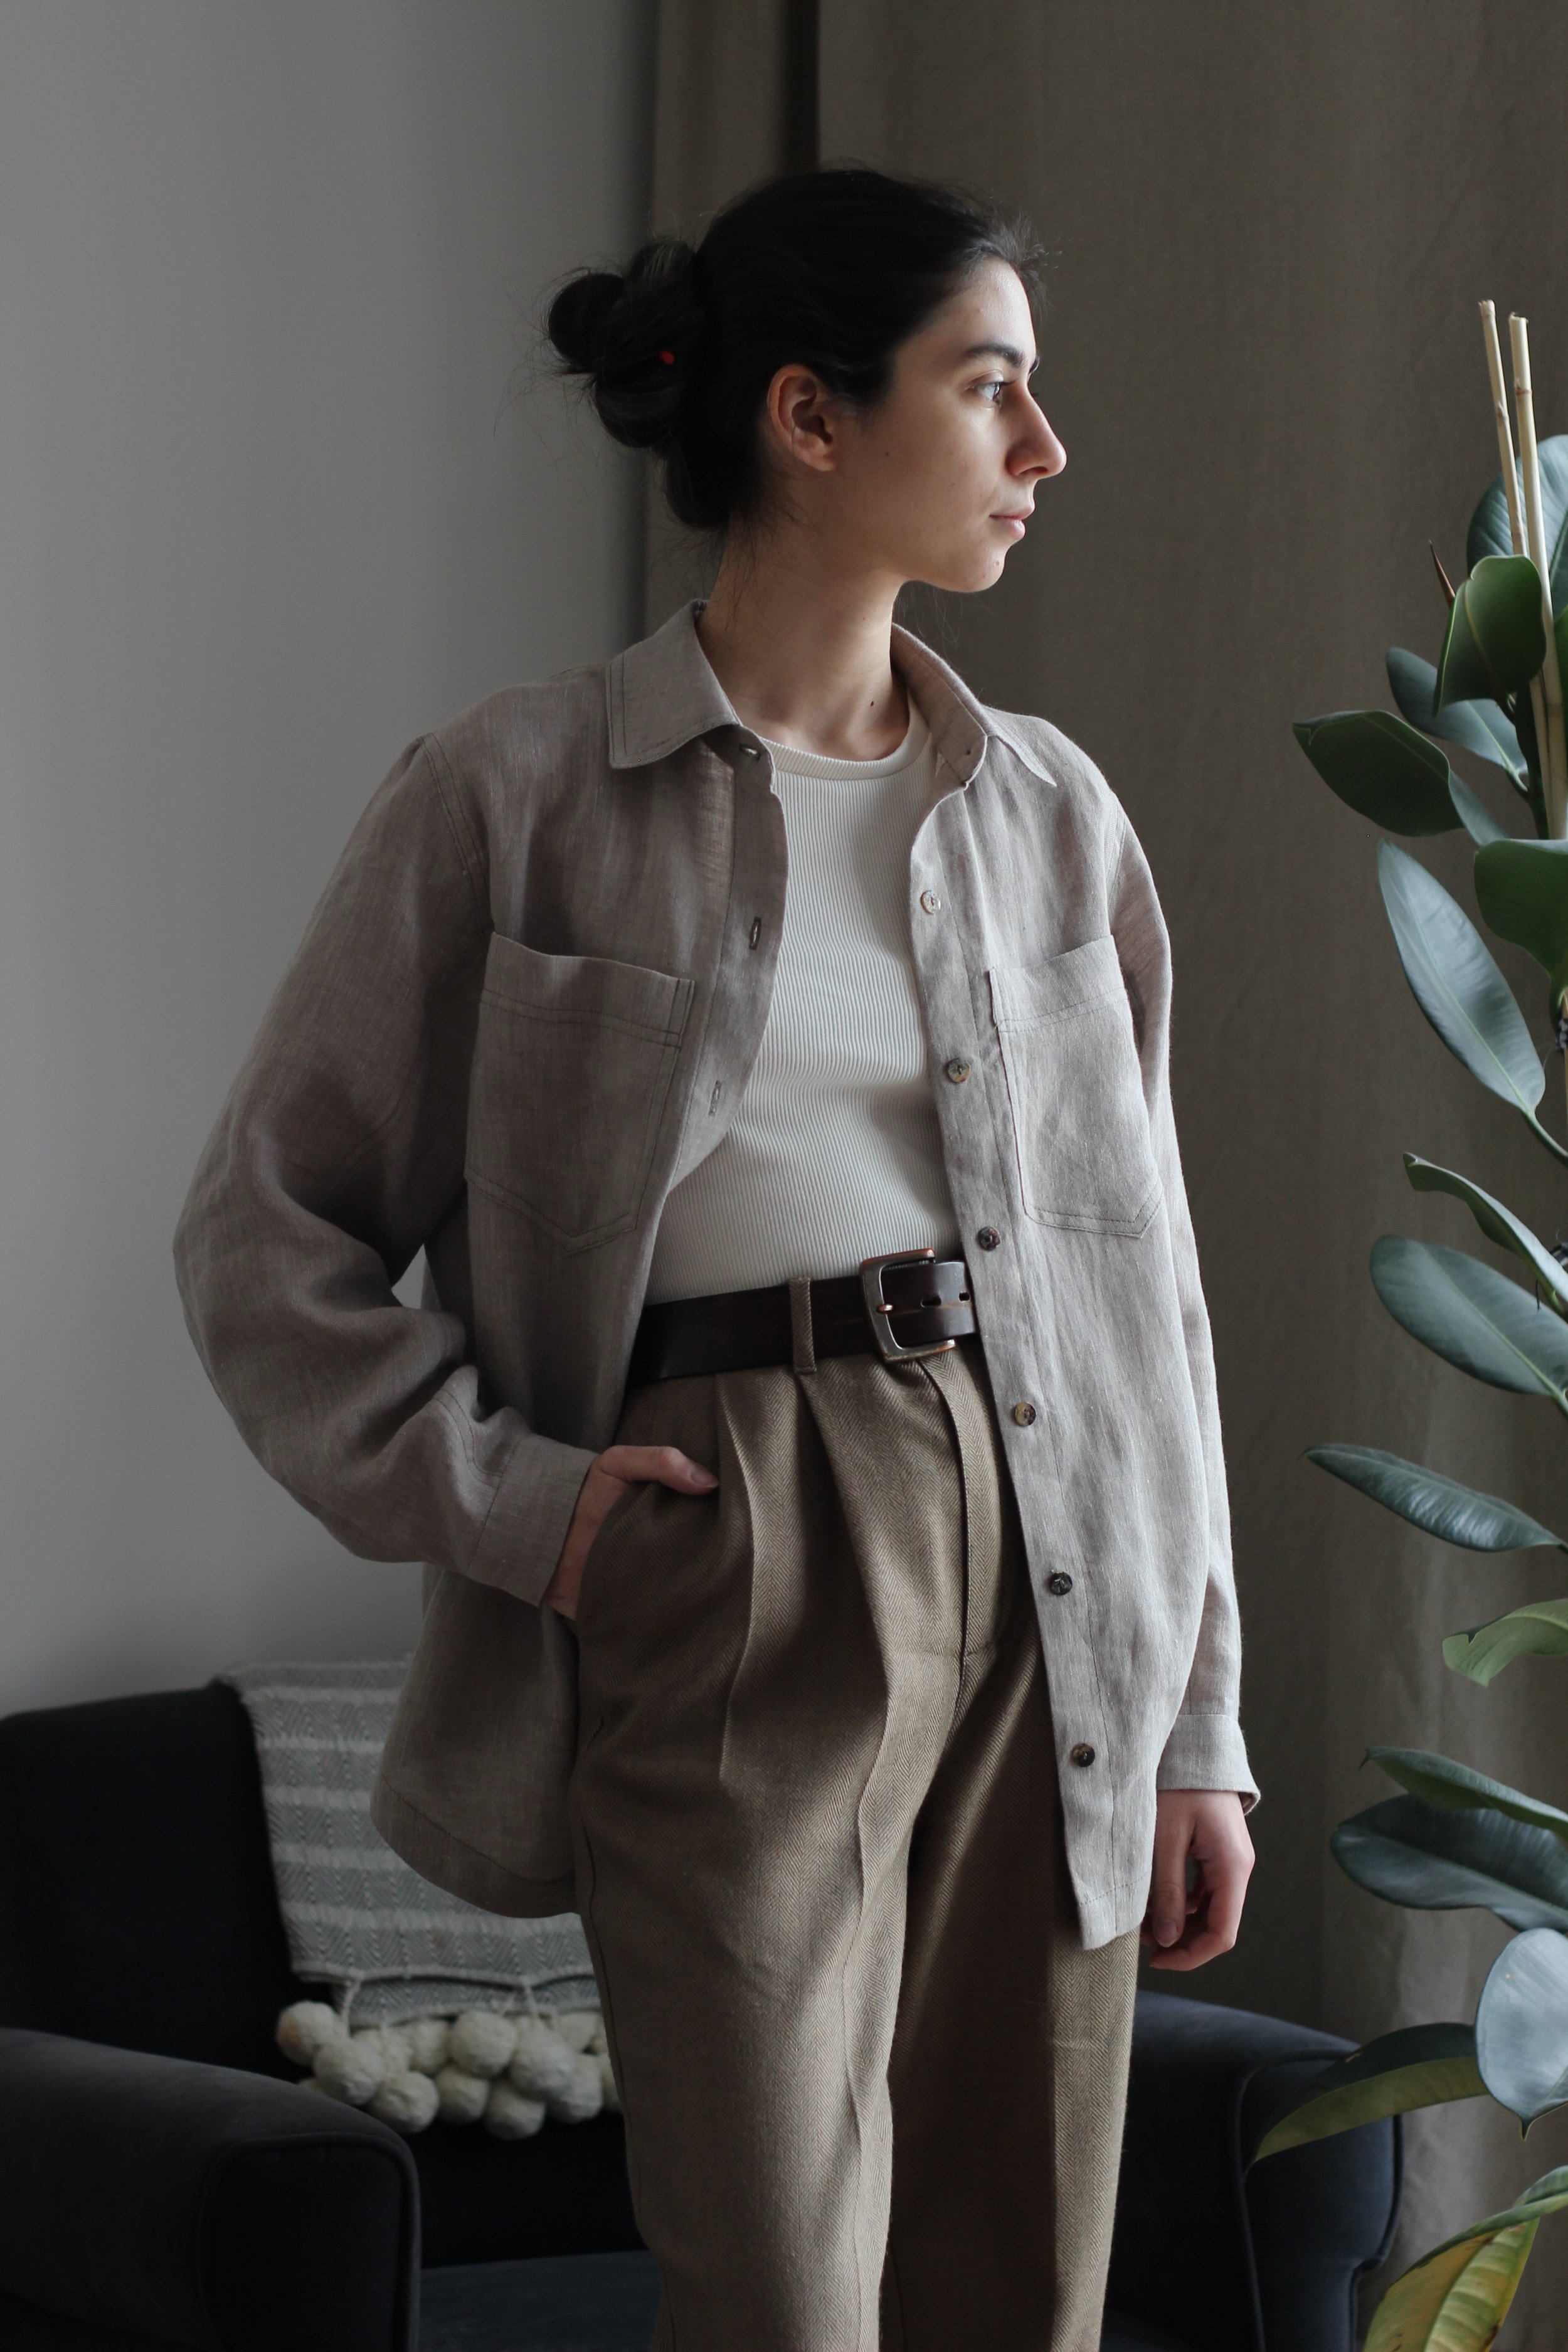

I decided to make the overshirt version (view A) out of some really lovely, lightweight, undyed linen I got at my local fabric store. I ended up using 1.7 meters for a straight size 34. For buttons, I went with the backs of shell buttons, and I love how they complement the undyed linen in colour and texture. I added some subtlely contrasting topstitching by using a darker neutral, Gütermann’s no. 727 to be exact.
Because this is an oversized pattern, I didn’t feel the need to make any size related adjustments to the pattern. For top patterns with sleeves I usually choose my size based on my high bust measurement (which is bigger than my full bust measurement) but in this case, I went with the size that most closely matched my full bust. I’m really happy with the fit, it’s loose enough to be worn over all my tees nad other tops, but not so big that it looks like it belongs to someone else, if that makes sense :) Because I used such a lightweight fabric, I can also easily wear it on its own and tuck it into my trousers and shorts, which immediately doubles its uses!
I really enjoy Deer and Doe’s instruction booklets, and the instructions for the Fougère were no exception: I found them all really clear and easy to follow. My only piece of feedback would be that the instructions have you finish almost all the seams by overlocker / a zigzag stitch, and I think some cleaner seam finishes coulıd be incorporated straight into the instructions. I decided to experiment a bit and used flat felled seams on the side seams, and I turned in the free edge of the hem facing instead of overlocking it. The sleeves are really interesting on this shirt pattern: they are composed of three panels: a front, a middle and a back. Instead of the traditional sleeve placket, they have a vent that has extensions on the back and middle panels. It was quite easy to construct, and it certainly alleviated the stress of having to cut into your sleeve piece in mid-project, but in my experience they don’t look as clean as a placket on the inside. I would, however, love to experiment a bit with different seam finishes on the sleeves / vents to make them look as clean on the inside, because I think they look great on the outside!


I feel like I always learn better sewing methods and tricks from Deer and Doe instructions (their zipper fly instructions quite literally changed my life a year ago) and this time, it was the collar stand instructions that provided the same a-ha moment! I always pressed the seam allowance on the inside of the collar stand before assembling the stand itself, but the instructions for Fougère have start sewing the stand in by 1.5 cm / 5/8” from the edge, meaning you can more accurately fold and form the seam allowance after you sew the collar stand to the neckline. Doing it their way gave me such a clean finish that I’ll always use this method from now on!
I opted to finish the inside of the collar stand and the cuffs by hand for a cleaner finish, and I added an extra line of topstitching 2 mm away from the seam lines. I also toptstitched the sleeves to the body, again using double lines that are 6 mm / 1/4” apart. I love how all the topstitching came out, it adds some lovely structure and durability to this very light and fluid linen.


Overall - I just adore how this shirt came out! I already wore it out a few times, and I have a sneaking suspicion that I won’t be able to take it off in the coming months :)
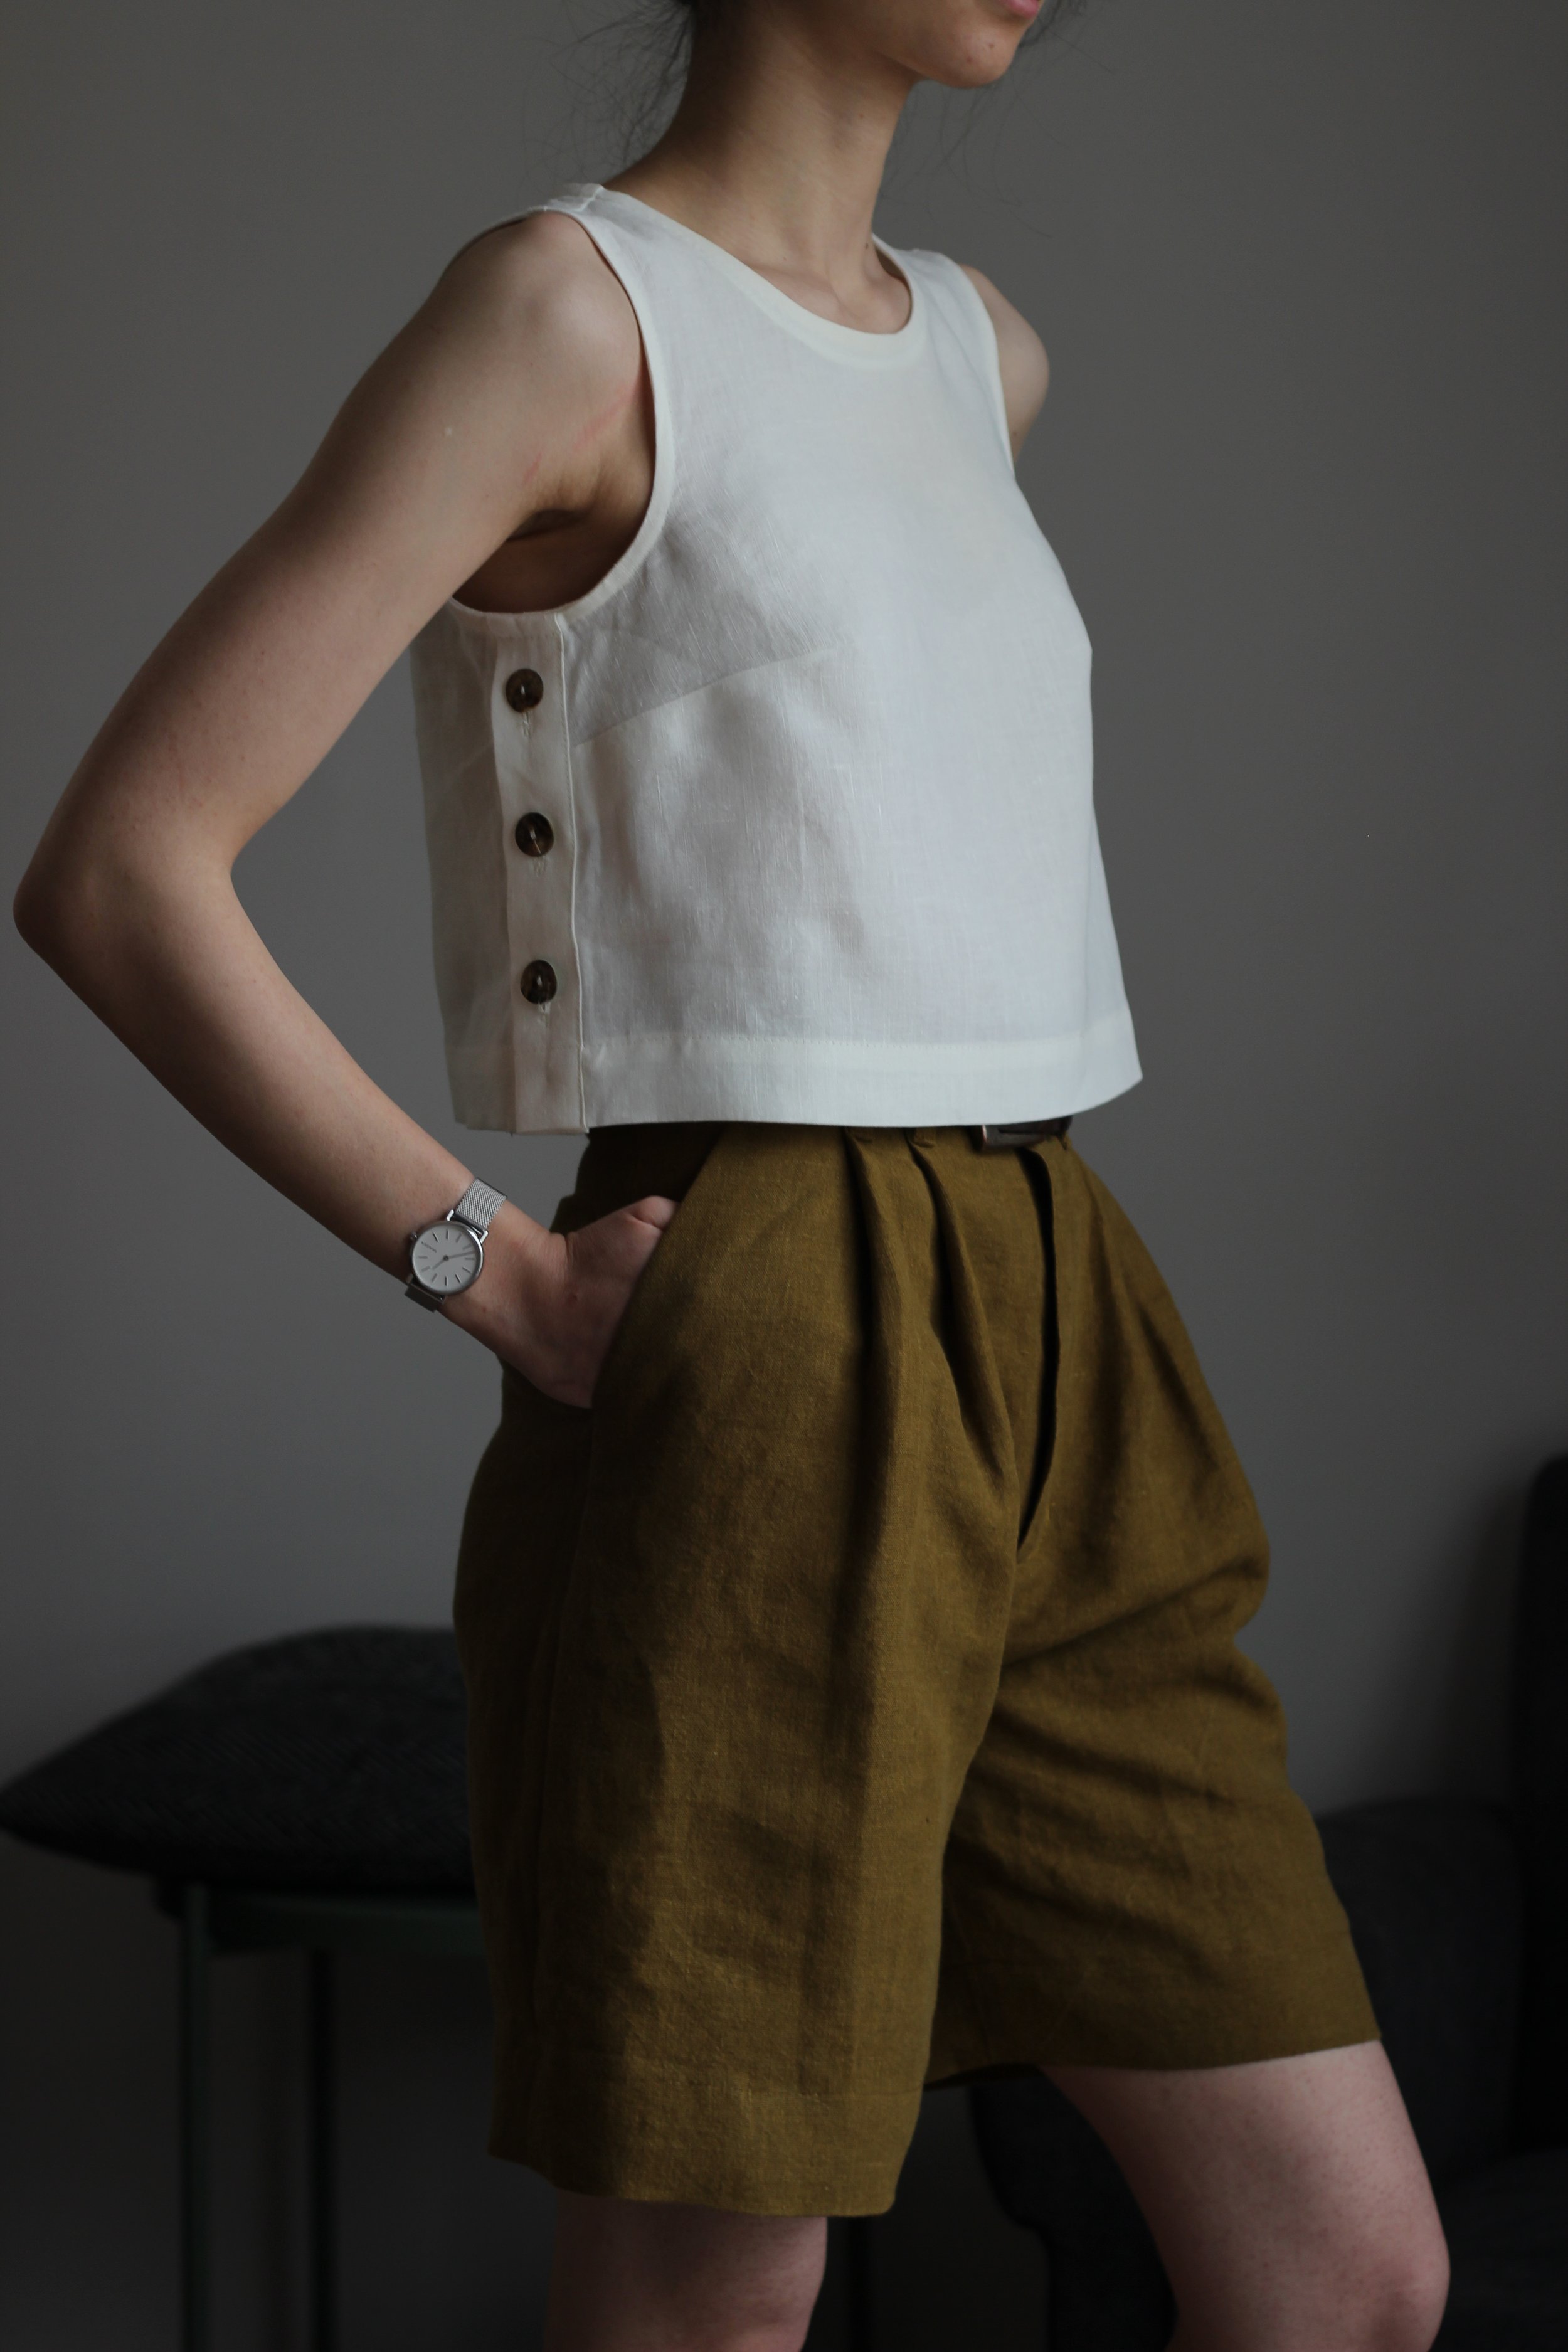
Genêt Pants
The Genêt pants (view A) and shorts (view B) feature a high waisted, double pleated, wide leg silhouette with single welt pockets on the back and slanted slash pocket on the front.


I toiled the size 34 in the full length view, and although it looked beautiful on, I know that I have a really hard time styling wide leg full-length trousers in my wardrobe so I decided to go with a shorter length. But since I toiled the full length, I can actually give you some useful insight in terms of their length! Now as I mentioned above, I’m 5 cm / 2” shorter than their fit model, so I took out 5 cm from the length before I even cut into my mockup fabric. I suspect these were designed to be worn with heels of some sort, because they ended up being way too long even after that. I ended up having to shorten them an additional 7 cm / 2 3/4” to get them at a length that would work with my every day shoes - Dr. Martens 1460s / 1461s.
After toiling them, I decided that I wanted a longer length than the shorts view, but a much shorter length than the pants view. In the end, I shortened them a total of 60 cm / 23 5/8” to get them to hit just above my knees. Other than changing the length, I made no further adjustments or modifications to the pattern - apart from throwing in some extra belt loops because I just can’t help myself :’)
For the fabric, I used a really heavy weight linen in the most stunning dark chartreuse colour. I got this vision of a summer suit composed of a relaxed blazer jacket and bermuda length shorts, and I simply couldn’t shake it. Looking back I definitely should have used a lighter weight fabric, this linen is very, very heavy and thick so it gived these shorts a very specific, structured look. In the end I'm happy with how they look as I love structured, architectural looking pieces, but I know many people don’t so consider this a warning to use a lighter fabric with more drape :)
(I’m still very much stuck on this idea of a summer suit by the way, so I’m hoping to make a matching blazer soon-ish!)
The instructions were amazing as usual, and I followed them to a t except for a tiny change I made in the welt pocket construction. I like to form my welts by pressing them into place after sewing them to the back instead of pre-forming them to get a neater look.


One thing I would like to point out for this pattern is that I don’t think you are meant to press a crease down the center front of the legs. The reason for which being that the middle point of the hem actually connects to the outer pleat instead of the inner one. In my humble experience of making and admiring many pairs of pleated trousers, the “primary” pleat is the inner one, which flows into the center crease, and the secondary pleat is the outer one. The soft pleats on these trousers look lovely without the crease, but I thought I’d just add this note in case you prefer more formal looking pleated trousers with creases pressed in.
I have been absolutely loving this bermuda length for shorts lately, and these have really cemented my love for this specific type of garment! They are so comfortable yet so classic and elegant, I enjoy wearing them and styling them so much! They look great with oversized linen shirts, simple tees, and of course the Hysope top :) These shorts / pants also feature the classic, massive pocket bags I lovingly associate with Deer and Doe patterns, making them super functional as well as beautiful.
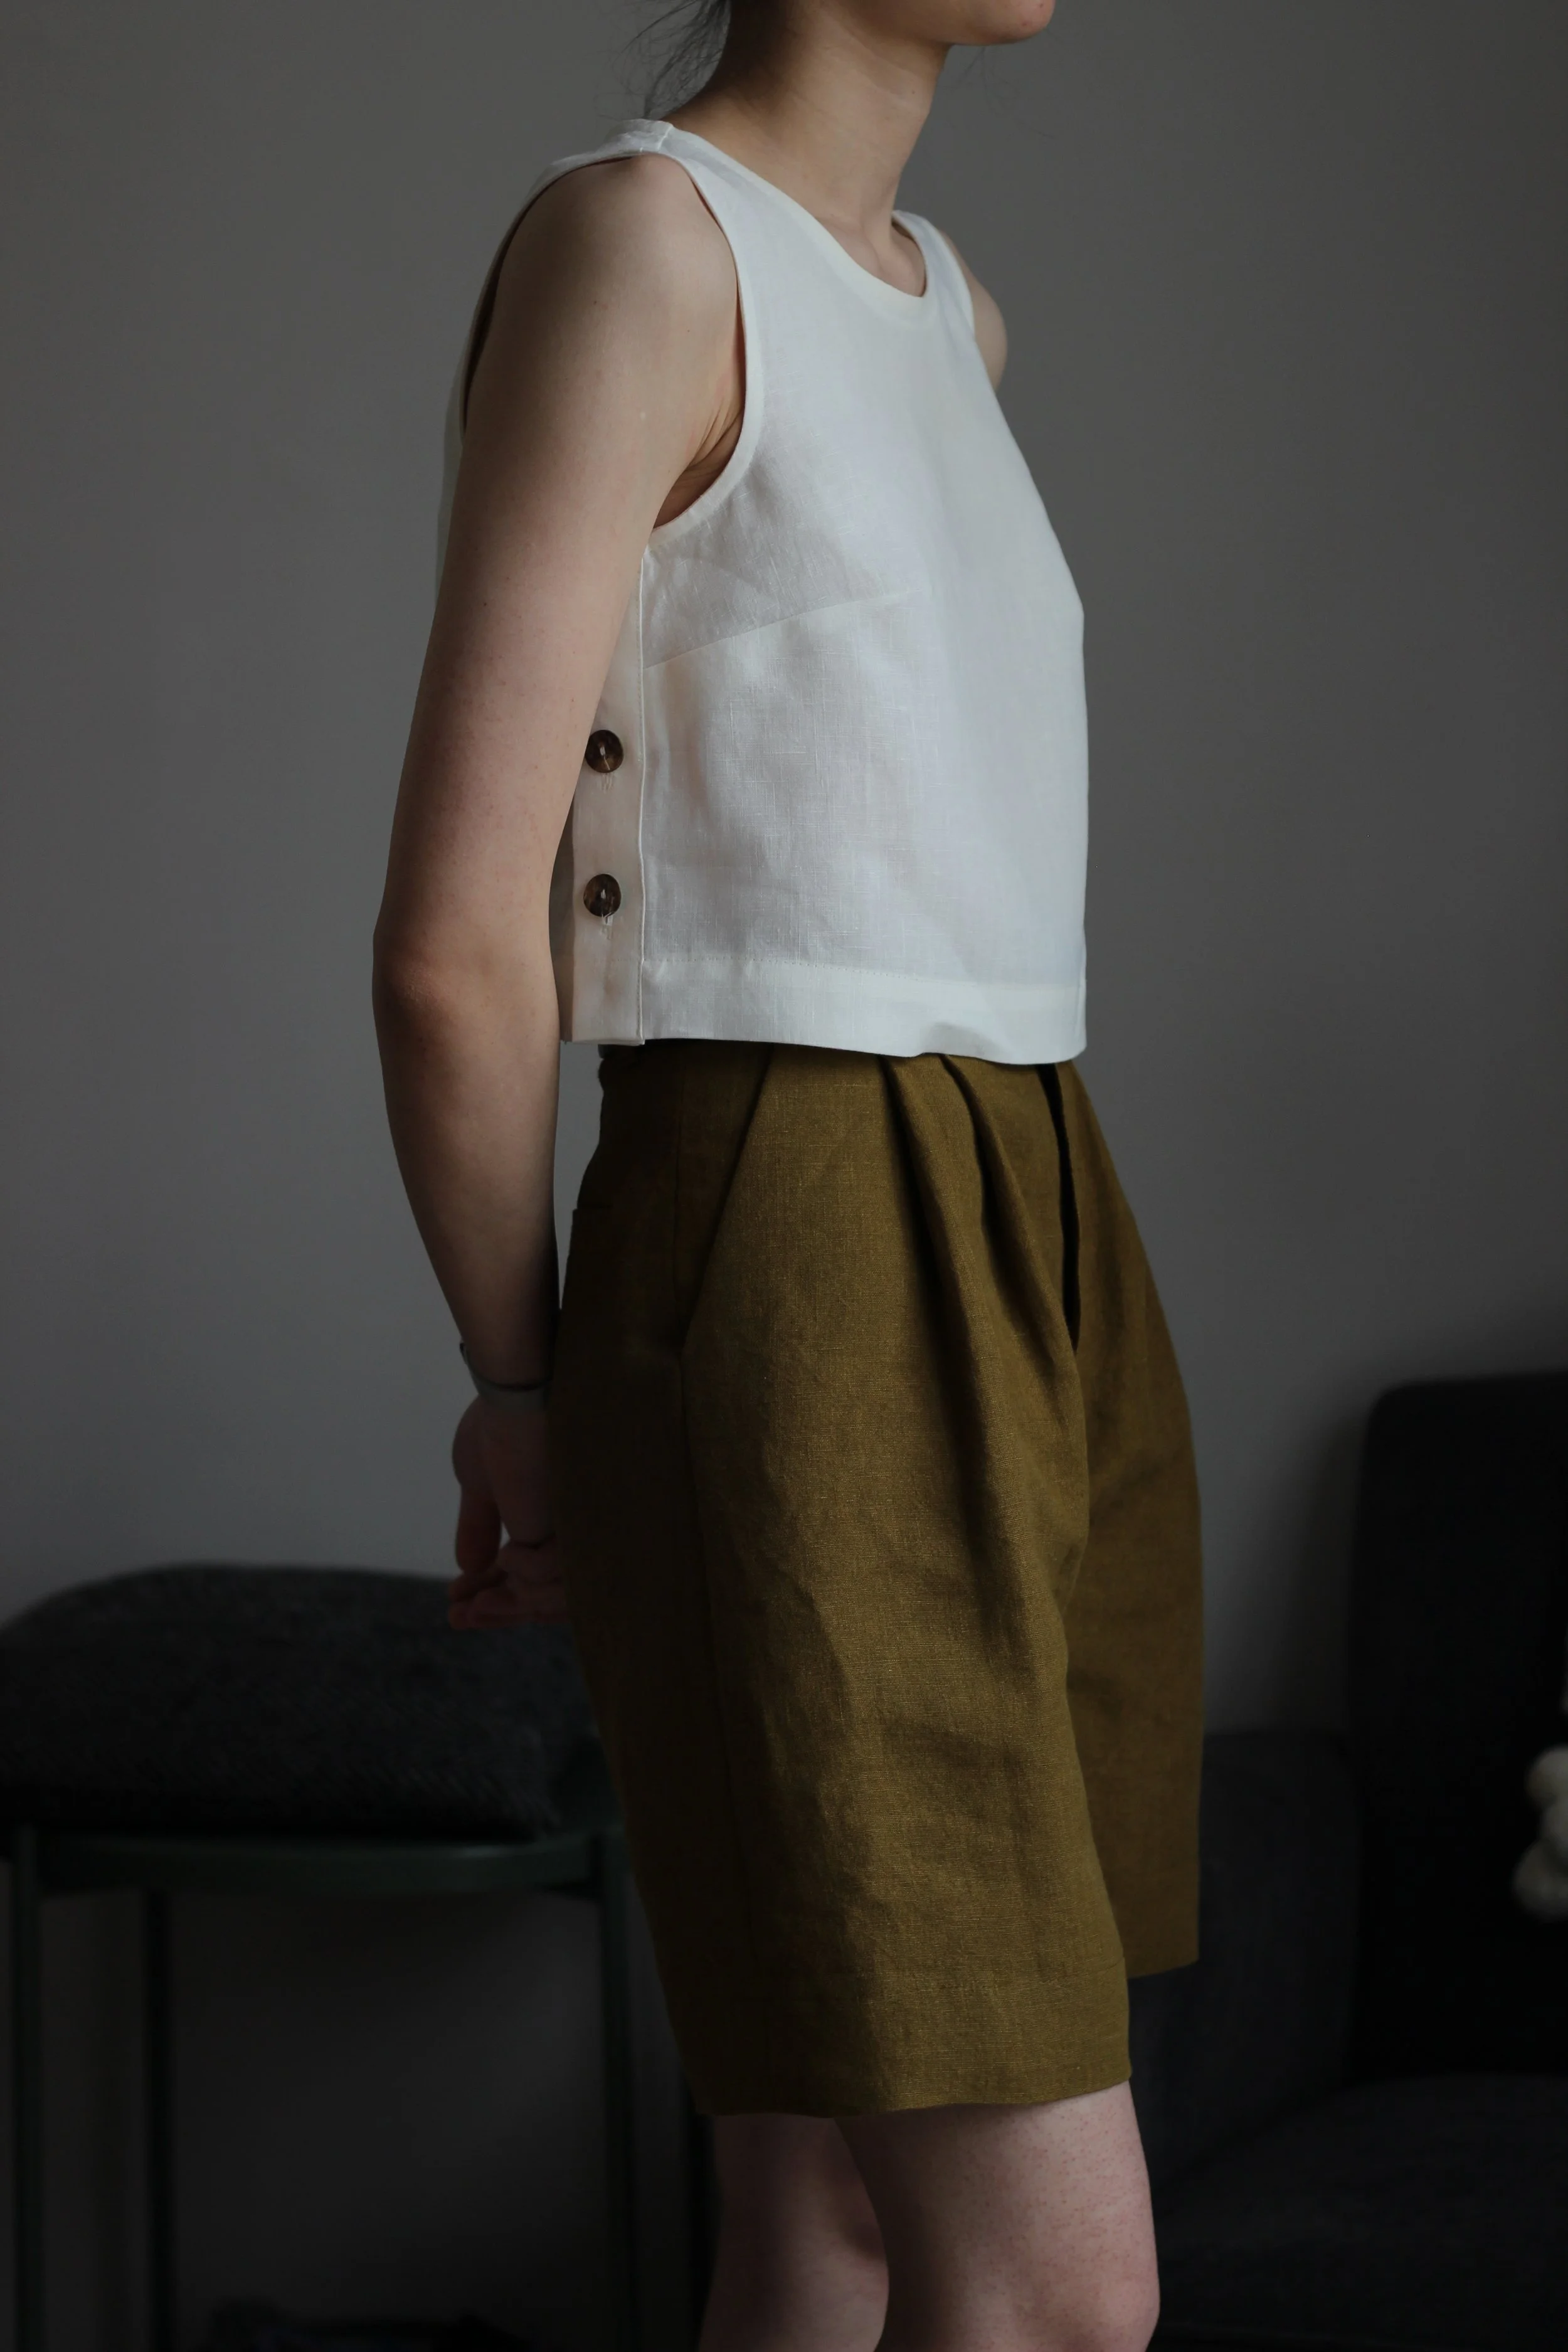
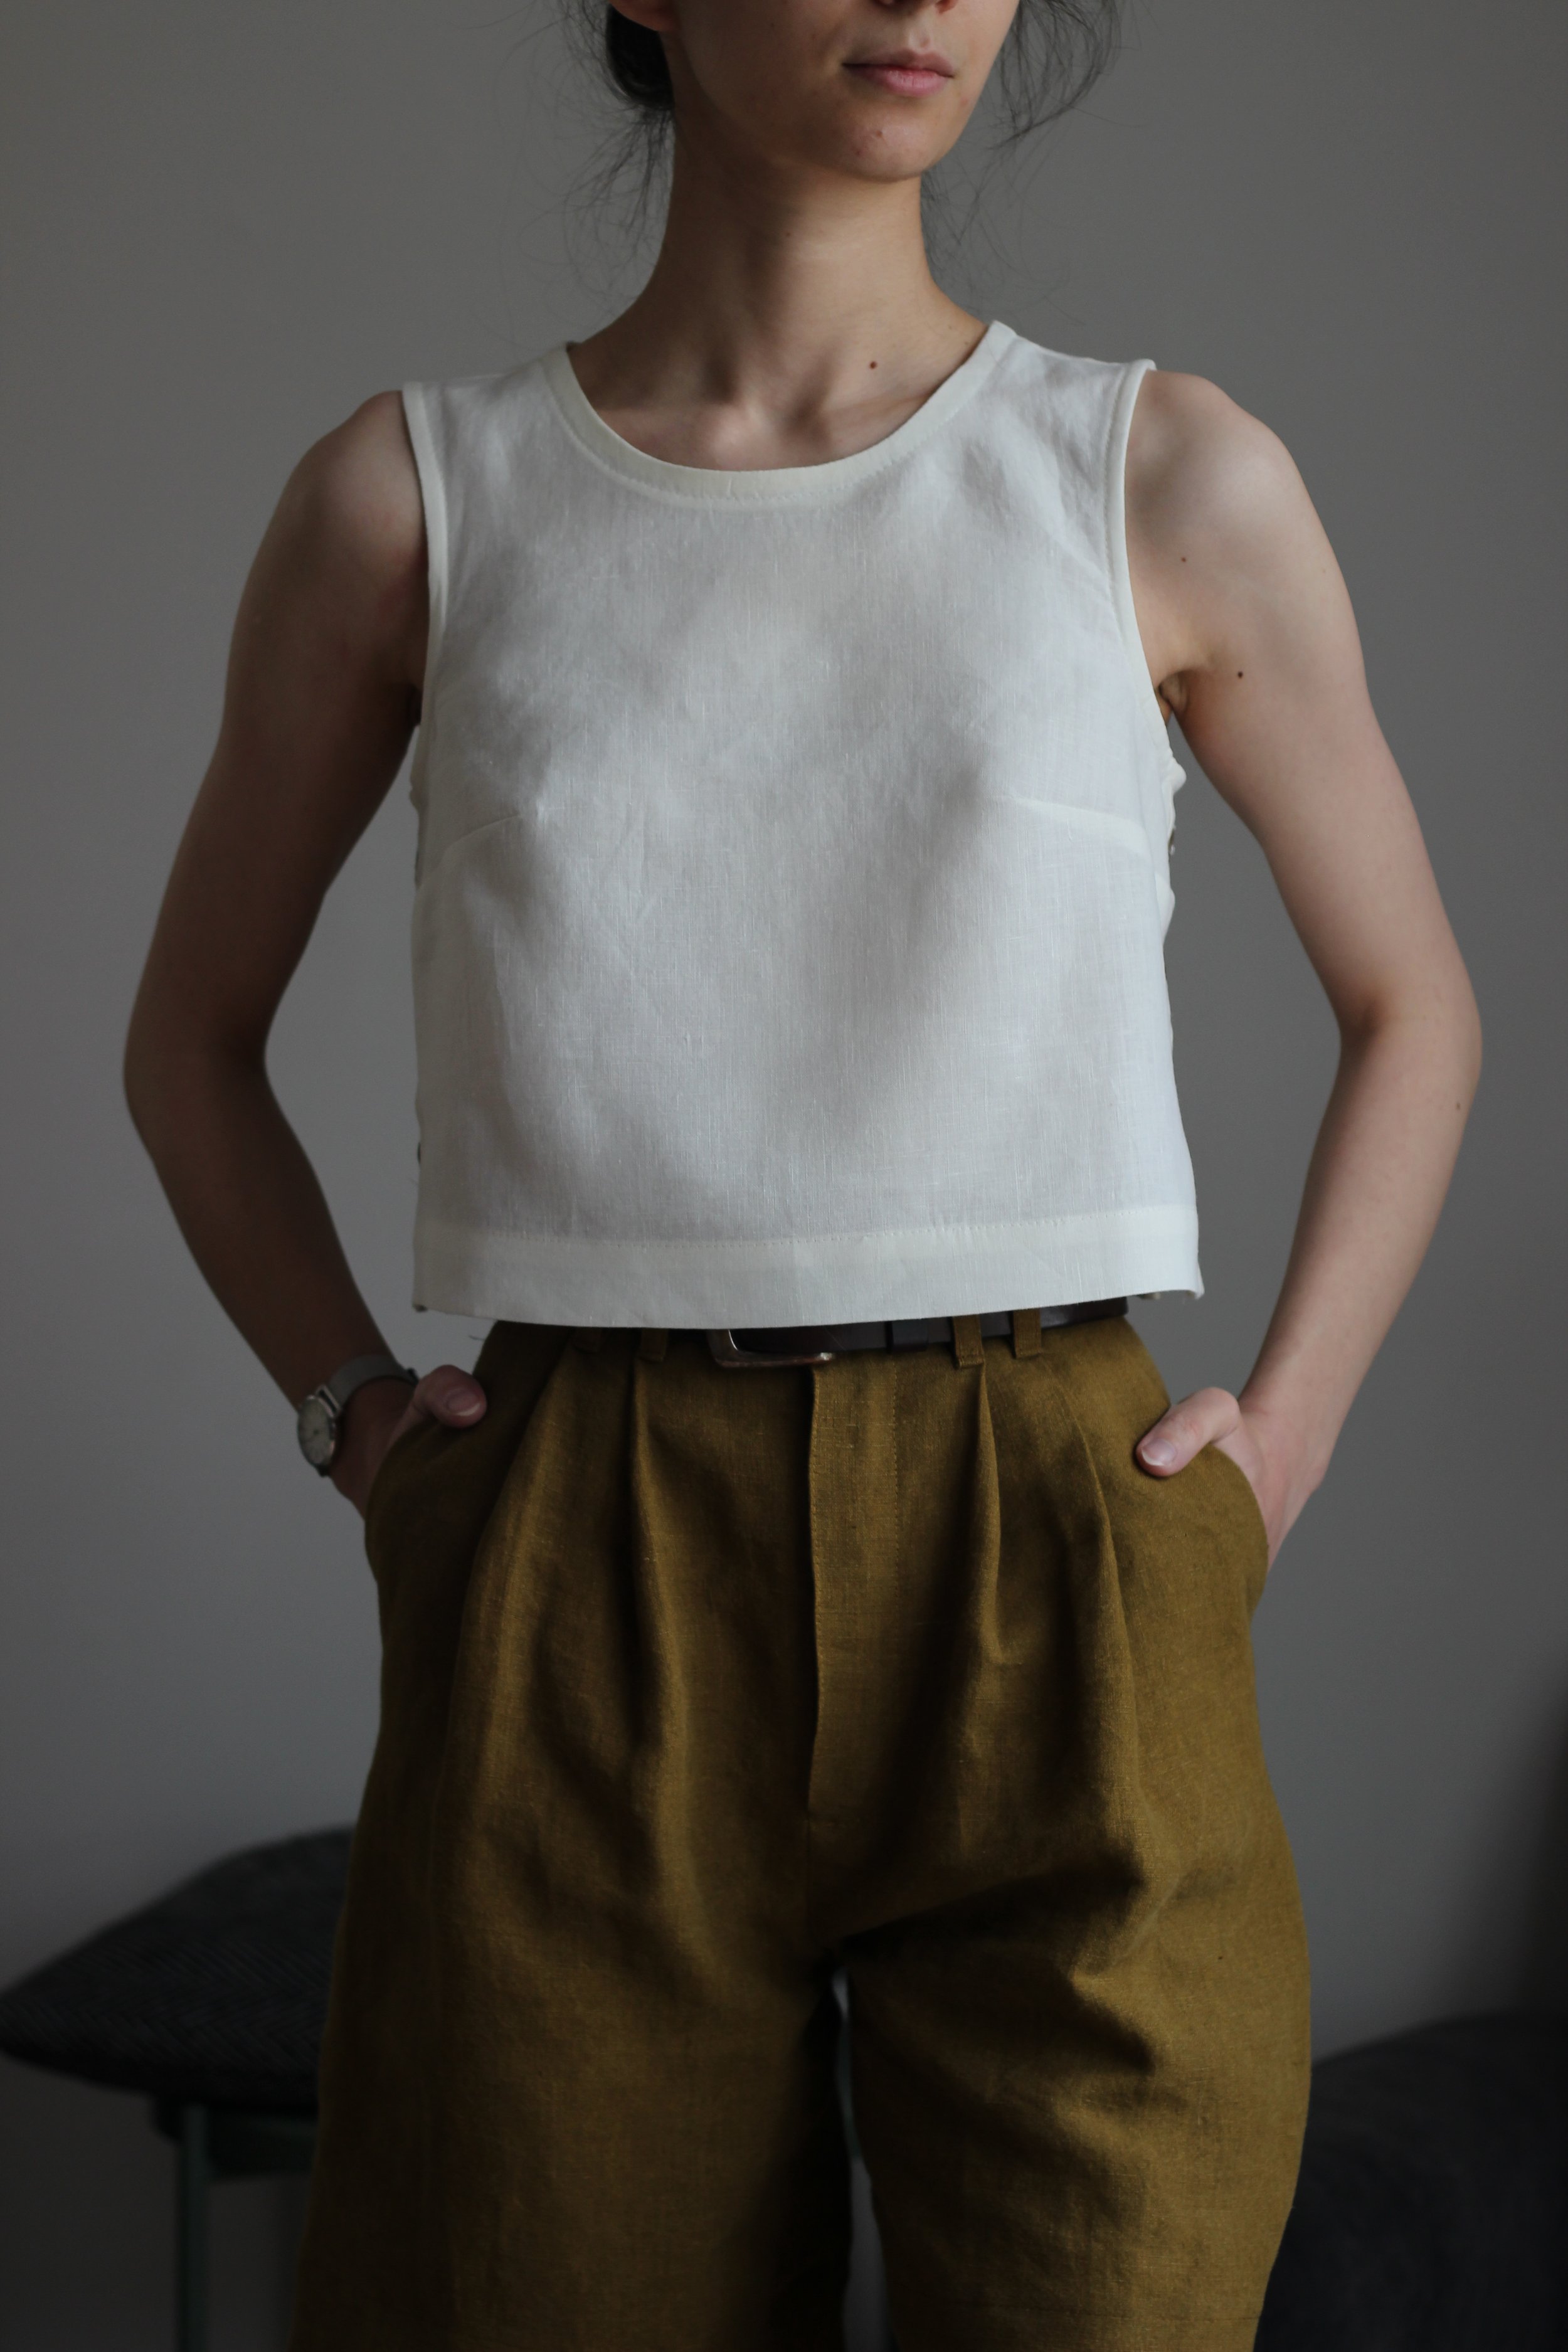
Hysope Top
The Hysope is a simple, beginner friendly sleeveless crop top with two neckline options: view A features a round neck and view B a V-neck. The inclusion of two button plackets on the sides of the top really elevate the piece, and the simplicity of the top makes it so easy to style.

Because Deer and Doe patterns are drafted for a bustier figure than me, I had to make a few adjustments to the pattern to get a better fit: Upon toiling it, I noticed that the bust darts were too low, and the the dart points were too far apart for my body. I used Aneka from Made to Sew’s wonderful tutorial to raise and extend the darts. Next, I noticed that the back of the neck was gaping quite dramatically, which is an issue I recently came across while making myself a waistcoat. Well I’m happy to announce that I finally figured out what caused it and how to fix it! I have really square shoulders, so the angle of the shoulder slope simply didn’t work on me, manifesting itself as extra volume at the back of the neck. To fix it, I simply lowered the neck point by 6 mm / 1/4” on the front and the back, and now it fits perfectly around my neck and shoulders.
Apart from these fit adjustments, I the only change I made was to use that clean-finish facing trick in the neck line facing. (Here’s Guro’s tutorial on this technique if you’re not familiar with it!) Looking back, I think I may have preferred to use some bias facing to finish the neckline, as I think that would look a bit cleaner but this is a perfectly good method as well.

I really like it when patterns that are marked as being beginner friendly don’t rely on using an overlocker to achieve a clean finish on the inside, and the Hysope was a great example of this! The pattern only instructs the sewist to overlock or zigzag the shoulder seams and the free edges of the neckline facings, both of which can be easily substituted with other methods. Personally, I used flat felled seams on the shoulders and used the aforementioned interfacing trick for the neckline facing. All other seams and edges are cleverly finished with button plackets, double folds or bias facings. Speaking of which, an interesting and simple way of applying a bias facing is used to finish the armholes, and I think it would be a really approachable method for beginners! Having sewn this, a beginner sewist would feel comfortable in sewing bias facings, regular facings, buttton plackets, buttonholes, and darts - which I think is great. It offers them a chance to expand their skill set without being too intimidating and complex.
For my version, I used some bleached, off white linen and -again- the backs of shell buttons. I just love how the buttons look against the white linen, they truly make this piece so special. The finished piece is an elevated basic that will be a life saver in the dead of the summer, as it feels really floaty and cooling in this linen!
Final Remarks
Overall, I just love this whole collection. The patterns included are really versatile thanks to their timeless design and multiple views. I can just see myself making them over and over again using different fabrics and getting totally different feeling garments. My personal favourite has to be the Fougère overshirt, because as you all know by now I’m just a sucker for oversized classic shirts with a twist!
The instructions and the drafting are excellent as usual, and I’m certainly going to be recommending the Hysope to adventurous beginners looking to learn lots of new techniques.
If you have any questions about any of the patterns, feel free to leave a comment or shoot me a dm on my Instagram! I’m happy to help if I can. Happy sewing!